Including the sun in your photos can be a creative way to capture different lighting in your images. But, the sun can also be a bit overpowering. Like any good composition, think about how and when to add the sun for the most effective impact.
Fog and Sunlight Can Create a Moody Atmosphere
Early morning or late afternoon, when fog rolls in, is a great time to add the sun. It will create a moody, silhouetted feeling much like what was captured in the image of the Atchafalaya Basin swamp below. The fog filters the sun reducing its bright hot spot to a manageable exposure.

Bright Sun Will Silhouette Subjects to Appear Powerful
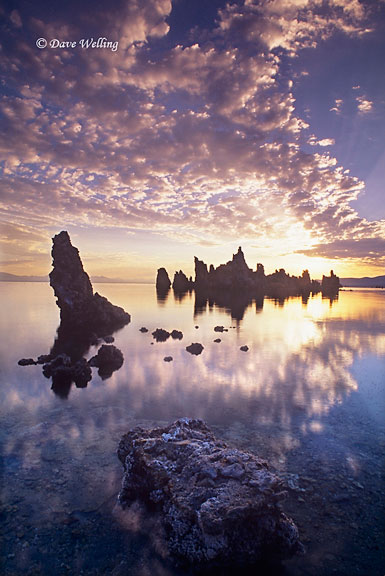
At sunrise, the sun can be incorporated above a mountain or ridgeline by using elements in the scene to reduce bright glare, yet still make it a strong element. The image of the silhouetted tufas at Mono Lake in California is an example of this effect. Here, the sun is brightening the image and giving it a more powerful feeling.

Blocking the Sun Makes Interesting Compositions
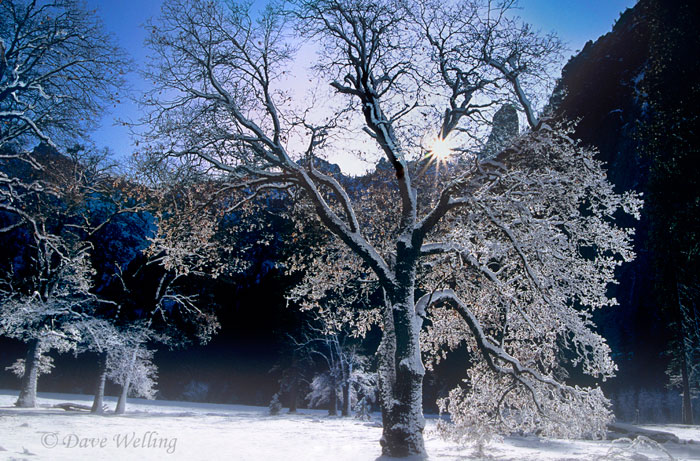
Another effective way to use the sun is placing it behind an element of a scene to again block its overpowering brightness. Placing the sun behind a tree limb is often used to achieve this. Using a small aperture opening (large aperture number) creates a starburst like effect for the sun and adds another creative element to the scene like this image of a snow covered black oak in Yosemite National Park.

Issues with Sun Photography
When incorporating the sun in your photo, be aware of two issues that can affect your image. First, NEVER look directly at the sun, even through the viewfinder of your camera. You may suffer retinal damage if you do. Instead, compose using the LCD display on your camera. If your camera does not have a digital display but does have depth-of-field preview, adjust your camera aperture to the smallest aperture opening and press the depth of field preview before looking into the viewfinder. Keep the preview button depressed as you QUICKLY compose the shot.
Second, most lenses incorporate multiple elements of glass in the lens. Each one of these elements has two reflective surfaces which reflect the light of the sun and can cause flare and other unwanted light elements in your image. You might not see these distractive elements looking at your LCD, or through the viewfinder (because it shows you the scene with the aperture wide open, not always including the flare elements). Using the depth-of-field preview will show you these elements if they exist. If they do and they are overpowering, try moving slightly to reduce their effects.
About the author: Dave Welling is a full time professional photographer specializing in wildlife, landscape and nature with over 75,000 6×7, 6×4.5, and 35mm film and digital images. He has been capturing evocative images of the natural world for over 25 years, producing the highest quality images for publication. His images often capture unique behavioral characteristics of wildlife or special lighting or weather conditions of landscapes. You can see more of his work at www.strikingnatureimagesbydavewelling.com.
Have something to add to the story? Leave a comment or email editor@outdoorphotographyguide.com.

Share tips, start a discussion or ask one of our experts or other students a question.
Already a member? Sign in
No Responses to “Using the Sun in Your Images”