Leading lines can be a very strong contributing element to your landscape photography. But, since photographs are two dimensional you need angled light to emphasize the leading lines. That makes the image appear three-dimensional and provides a substantial graphic element to draw the viewer into the scene as he/she follows the leading line into the image.
Using Light to Create Dimension
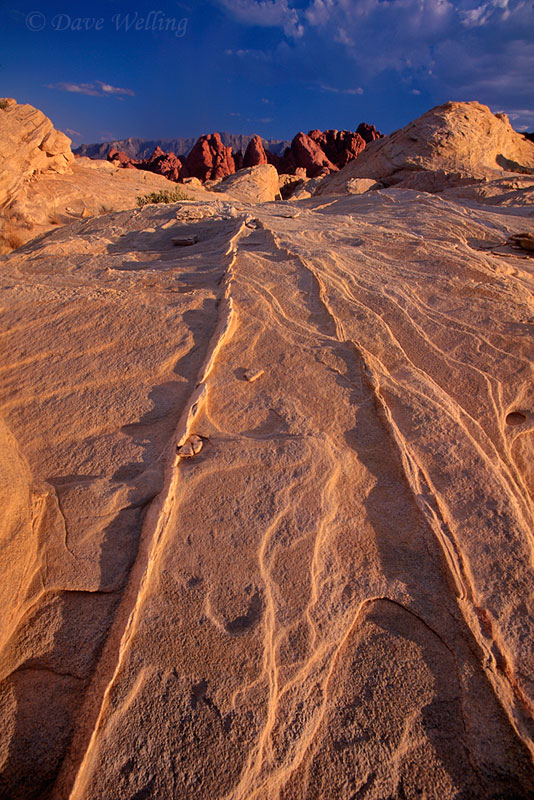
Because the leading line actually “leads” your eye into the image, you need to have a strong component at the end of the leading line or your eye will follow the leading line right out of the image and defeat your intended purpose. This image below of the Valley of Fire with the sandstone formation leading lines was taken in low angled sunset light with the light coming in at 90 degrees to the sandstone lines. This lighting produced shadows, giving the desired three-dimensional effect. The camera was placed low to the ground for additional emphasis to the sandstone lines. The lines lead the eye to the red rock spires in the upper third of the image giving the eye a “landing spot” so it does not draw your gaze out the top of the image.
The Rule of Thirds
The lines pass through “rule of thirds” points in the lower half of the photo (the most interesting areas of an image). To visualize the rule of thirds, you dissect the image with equidistant lines like a tic-tac-toe game, making four intersecting points. Often, when these points of an image are attention-grabbing, it helps increase viewer interest and impact. Always remember, though, rules like the “Rule of Thirds” are not really rules, they are guidelines. Use them or discard them as you see fit.
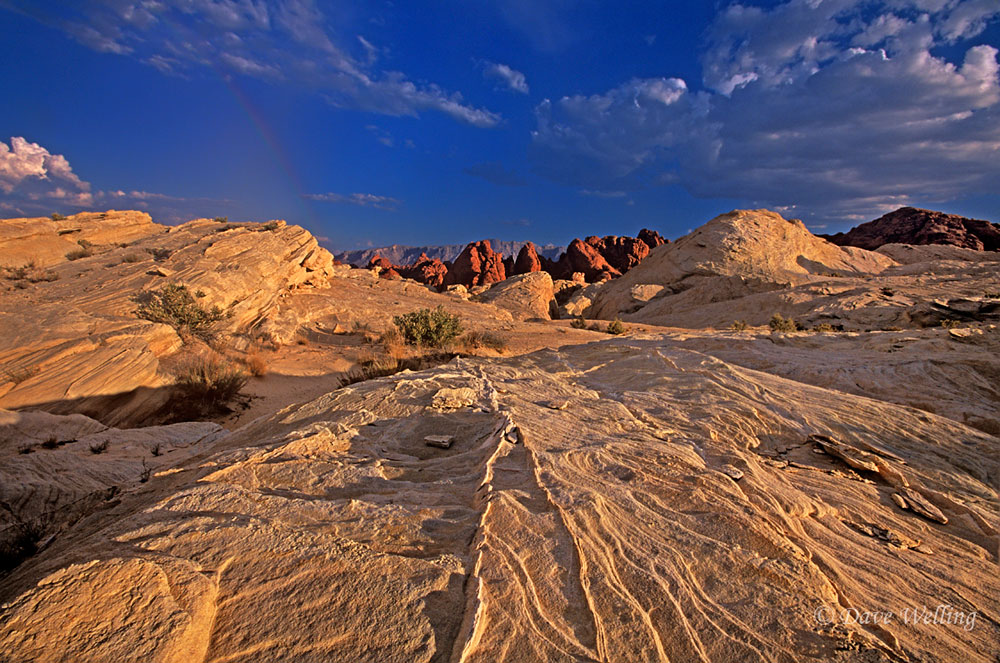
Now look at the horizontal image taken from the same spot. The camera is not placed as low to the ground so the leading line effect is minimal here. The horizon is still placed in the upper third of the composition to emphasize the sandstone formations in the lower two thirds of the image. It gives the viewer an entirely different look of the same location taken from the same spot. When you have interesting landscape elements as you do here, always spend extra time finding what I call the images within the image. That is, you stop to photograph an image like this because of what initially grabs your attention. After you take your initial “why I stopped here” image, look for different ways to interpret the same scene or find elements within the scene you can extract.
About the author: Dave Welling is a full time professional photographer specializing in wildlife, landscape and nature with over 75,000 6×7, 6×4.5, and 35mm film and digital images. He has been capturing evocative images of the natural world for over 25 years, producing the highest quality images for publication. His images often capture unique behavioral characteristics of wildlife or special lighting or weather conditions of landscapes. You can see more of his work at www.strikingnatureimagesbydavewelling.com.
Have something to add to the story? Leave a comment or email editor@outdoorphotographyguide.com.

nice pics