How to Adjust Your Photo with Camera Corrections
Layne Kennedy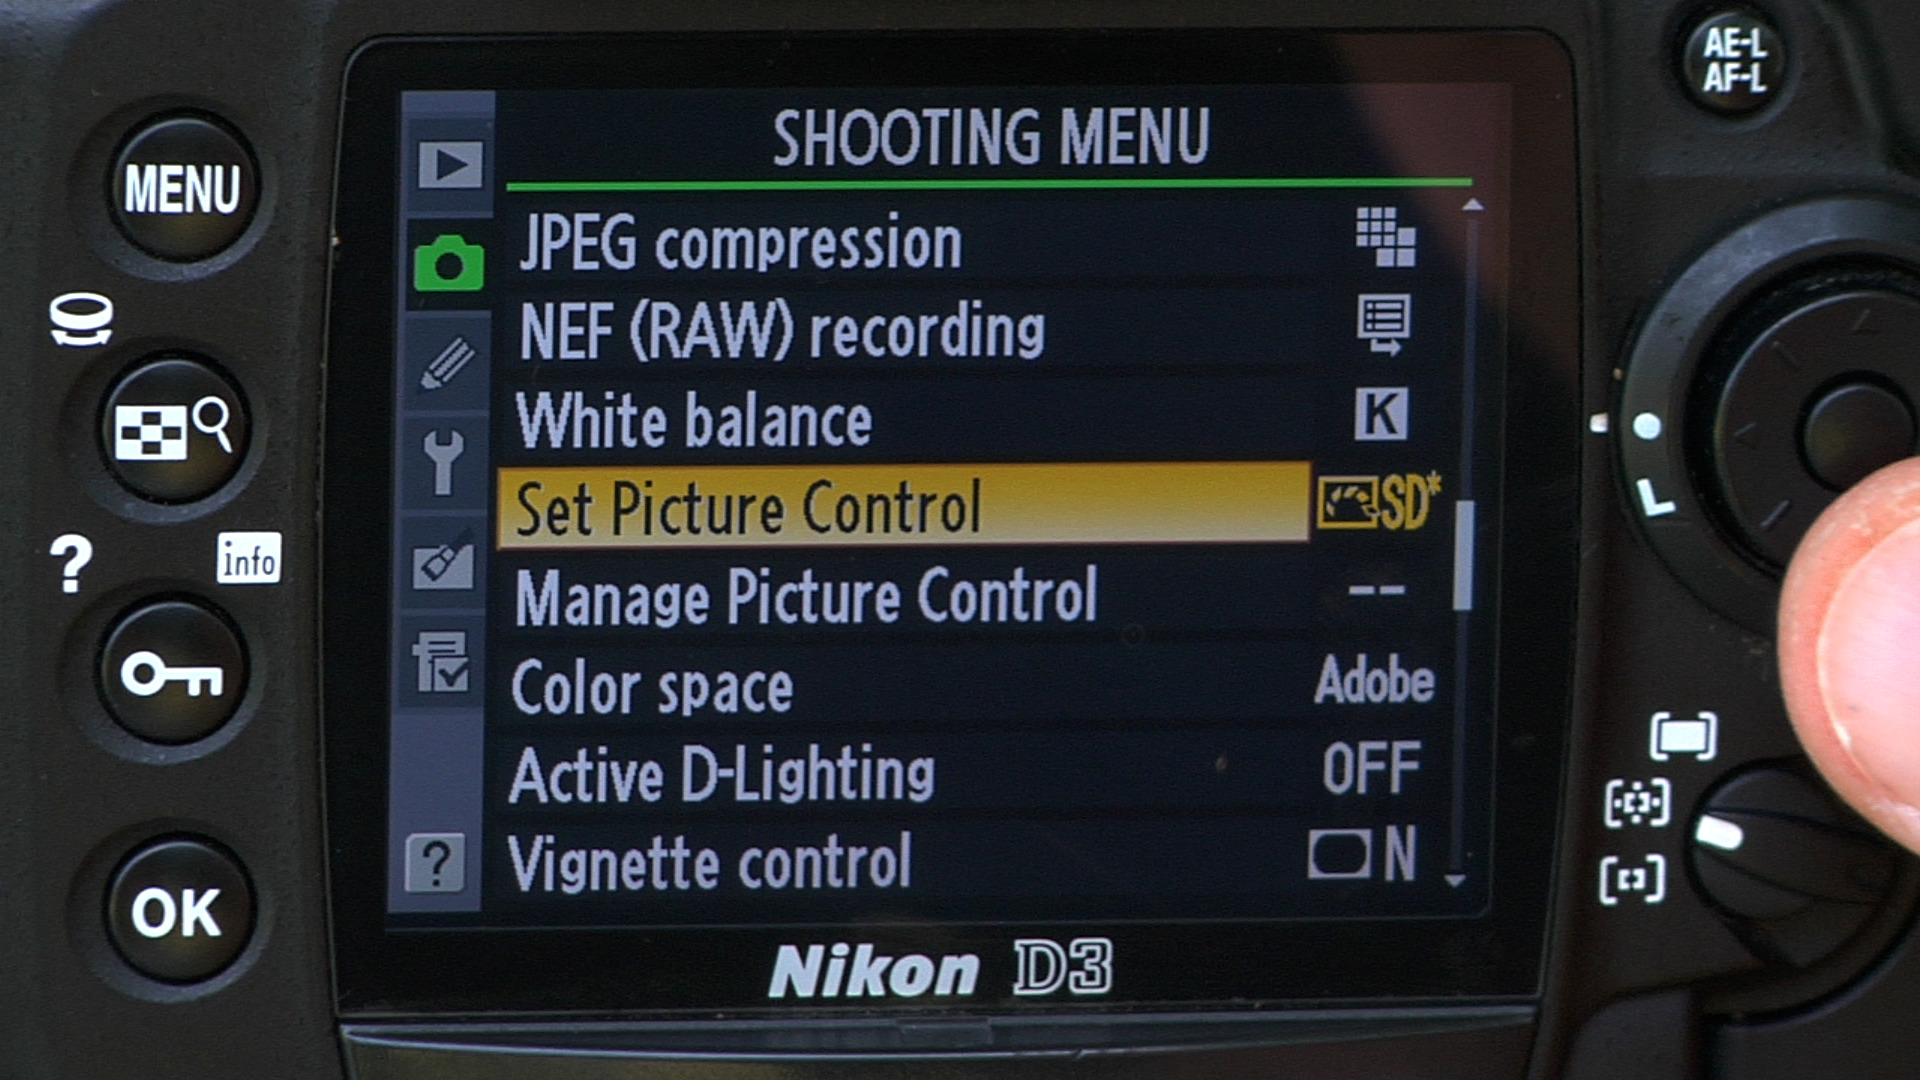
Video Player is loading.
To help you save a lot of time and get the best possible photographs, this video walks you through the various camera settings and menus you can adjust to get certain results. The expert instructor shows you actual settings on his camera and demonstrates these by taking some test photographs. Although each camera’s menu names and settings are slightly different, you can easily apply what you learn in this video no matter what camera you have. Armed with the information you learn here, you’ll know how to alter issues like lighting and contrast, thus making post-processing significantly more streamlined.
There's a lot of settings on our cameras that we can use almost daily when we're out shooting. And there are some tricks to the trade. And there are some things that you should be aware of when we're shooting them. One of the very first ones is image quality. And on my camera here, I'm using a Nikon camera, this is a D3.
And in the menu, which I'm going up to the shooting menu, and the shooting menu gives me all my various options of white balance, image quality, color mode, all of these things. So that's probably the menu setting in the shooting menu that most people are going to use. And so we're going to start off with image quality. And I'm using image quality because when you see image quality, and you've got a number of choices, and that kind of starts off with, I shoot everything in RAW because there's a greater number of capabilities in shooting RAW than there is just shooting JPEGs, which is an image that has already been processed in the camera, which limits how much latitude I have when I want to play with it in post-processing. In other words, the RAW image is actually giving me all of the data that I need.
A JPEG is compressed, and I'm missing some of the data because it's already taken place. So when you're in that image quality setting, you can see, you've got TIFFs that you can shoot. You can shoot JPEG fine, JPEG normal, JPEG basic. The differences between those is JPEG basic is a lower end type of a JPEG as opposed to JPEG fine, which has given me the same file sizes that I'm actually getting in RAW, just that it has been compressed. Now, the other is that when you're looking at RAW, you can do NEF, and mine, the RAW file is called a NEF file, RAW plus JPEG.
Now you can do RAW plus JPEG normal, JPEG fine. I tend not to do these for 99% of my work because all it's doing is doubling up the file size for each shot that I take, because I'm getting two frames per each image. And it wastes card space for me. I'm doing all my processing in RAW afterwards, so it doesn't matter. So that's one of the considerations to make when you're looking at that.
So let's go continue on in the shooting menu and let's go over to white balance. Now here's a case that I think most folks shoot white balance on auto, and that's just fine. It allows you to, even in post, go in and make all the corrections. But for the most part, it's so accurate in being able to depict what the lighting situations are, you're getting a pretty true image. On the other hand, I shoot a lot of people and I shoot a lot of landscape.
So I actually like to choose my own color temperature. So if I come in, well, let's do this. Let's take a shot. We've got Bryn that's sitting over here. Let me do a quick focus.
She looks great sitting over there, going to do a focus. I'm going to go ahead and take a shot. And this particular shot is on auto white balance. In the shade, this is going to be fairly cool; it's going to have a blue look to it. So I'm going to go into my white balance, and as opposed to going into cloudy or shade settings, I'm actually to come down here and warm it up even more.
I'm going to choose my own color temperature. I'm going to go to 6670 Kelvin temperatures. And I'm going to take another shot. All right, so now let's take a look at these two shots. Here it is warmed up.
Look how warm that is. The skin tones are gorgeous. Here's auto. See that difference? Look at that, bluish as opposed to warm.
So when you're in that white balance mode, all of these options that you can choose, for the most part choosing auto is fairly safe because you can always change it in post if you need to, if you're shooting RAW. But the nice thing is that you can choose any one of these settings. Now, I want you to remember that if you're in the shade or the cloudy settings, what that's doing is if it's in auto and you're in shade, by going to the shade setting, it's doing the same thing as I did going to color temperature. It's simply warming up the shot, because this bounced light is bluish in color. Going to shade is warming it up.
By going down and choosing my own color temperature, I'm warming it up by choice. And you can see here, the way it works, the higher the number, the warmer it gets. The lower the number, the cooler it gets. All right? So that's our white balance.
So let's go back in the shooting menu. Let's go over here to, let's go down to color space. That's always a common one that people may or may not understand. By default your camera comes in sRGB setting. It's a shortened gamma range of the colors that are available in that setting.
If you are simply making prints by using normal prints from a local processing lab and what have you, sRGB settings are just fine for that. If you want more control with it, you want to widen your color gamut, then you would jump over to Adobe RGB, also called Adobe 1998 settings. And that's where you would go for your color mode. So it's a personal preference thing. It's based on what your output is going to be.
All right, so let's jump down here now to another setting that you tend to see. And this is on Nikons and I'm pretty sure that this setting is called something different on almost every different camera manufacturer. On Nikon it's called "Active D-Lighting." And this is a nice setting. So when you're out in the field and we're looking at the various options within our shooting menu, the Active D-Lighting gives us a kind of control over contrasty scenes. So we've got Bryn that's in the shadow now, but I've got some sunlight that's falling behind her and I've got some trees that are in shade.
So with the Active D-Lighting menu set on off, here's the shot that we get. Let's take a shot, let's take a peek. There's our frame, okay? So we can see that shot. Now, if we want to bring out some more of these shadow areas in here and control some of the light, let's go to Active D-Lighting in this scene, because it's fairly contrasty.
After we get past her, let's jump up to high. Let's click okay. Now let's take another shot. Now look at the difference here. There's the Active D-Lighting.
Watch the backgrounds and the shadows. Here's the shot when it's off. See the difference? I haven't changed my exposure. I haven't changed my focus.
I haven't changed anything. I've simply gone from Active D-Lighting off to Active D-Lighting in high, and look how much more information has come out. So this is a unit with the Nikon camera that's actually doing some processing for me ahead of going in and processing the RAW files in post. So that's the big difference. So here's a couple of quick little shooting options that you can use off your shooting menu that can change and alter your images in camera and not have to worry about it in post-processing.
And you'll be amazed at some of the things like the Active D-Lighting, how you can actually come away from a photograph that's already gotten its boost before you even leave the camera.

Finally responded: Format not supported.
On my MacBook Pro, I get no response for this video. Can't watch it. Disappointing.
Hi. Was a little confused about your statement on colour temp. I was always told that something at a higher colour temperature was colder not warmer. So something around 5000k was warmer the something at 6500k. So I was wondering, why is a tungsten lamp at around 2500k look yellow if the camera is set at 5500k ?
What is the ball head on the tripod from video - Photo with camera corrections?
Please explain why you stated the higher the Kelvin number the warmer the light. This is opposite to fact.
Looking forward to this.
A great educational, thank you. I notice that when Active D-Lighting is High then you have more blinks flashing. To lower the contrast is the camera simply increasing the exposure by a fraction of a stop?