How to Take Pictures of the Night Sky: Beginning Set-up
Doug Gardner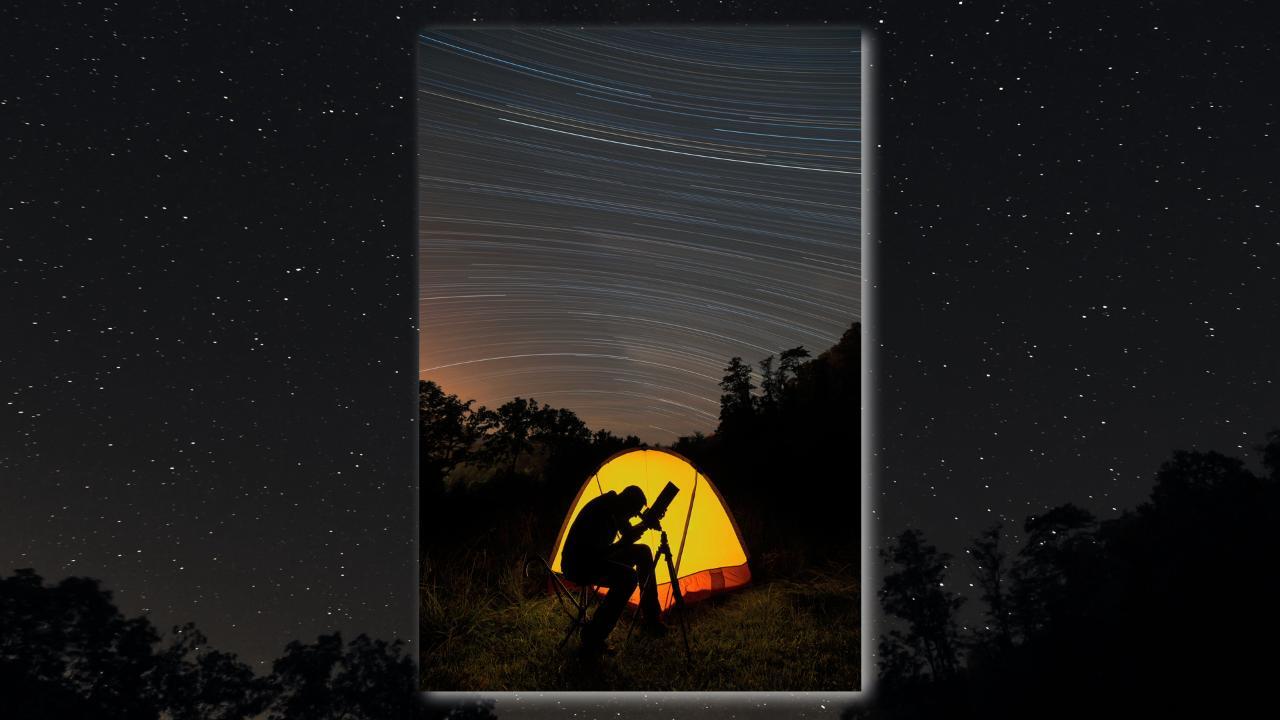
Video Player is loading.
Shoot photos of stars trailing across the night sky that will make people notice. You will learn how to set up your shots and how to enhance star photos in Photoshop for more dramatic effects.
Learn to how to take pictures of the night sky, creating photographs of star trails that will wow everyone who sees them. Professional photographers Doug Gardner and Kevin Adams take you to the southern Appalachian Mountains to show you just how it’s done. The course will teach you how to plan ahead and set up your shots while it’s still daylight out. You will learn how to determine where the constellations will be in the sky throughout the night so you can plan your shooting schedule and how to set up the composition of your shot ahead of time.

See all of the videos in our How to Photograph the Night Sky Course:
- How to Photograph the Night Sky – Course Preview
- How to Take Pictures of the Night Sky: Beginning Set-up
- Tips and Techniques for Photographing the Moon
The Southern Appalachian mountains have long been known for its many waterfalls, lush mountain range beautiful wild flowers and abundant wildlife. But rarely is it thought of as a great place for nighttime photography. Well, this week we're going to join up with a good buddy of mine. Kevin Adams, who lives right down here in the Valley. And he's going to share with us his techniques of photographing the magnificent night sky.
I'm your host, Doug Gardner and your wild photo adventure starts now. Kevin, as always, it's a pleasure being up here in the Appalachian mountains with you. You know, we did the nighttime waterfall show with you back last year and we had such big response people wanting to know more about nighttime photography. That's the reason I said we need to do a whole show on nothing at night photography. What do you have mind for us?
Yeah, that was a lot of fun wasn't it. And I am excited that you are back and that I can have you in my front yard. Well, I hear your dogs barking. They're not my dogs. I do live in the country though.
Well, I guess that's good for, for night photography. You don't have to worry about light pollution. It is good, but you know what? We're only 20 miles from a medium sized city that had lights but we're in a bow here. We're kind of surrounded by mountains and you can see the trees that we have all around here so I can shoot the night sky right from my front yard.
That's awesome. You know, and the cool thing, the really cool thing about night photography is the night sky is above all of us. All of us. That's right. Yeah.
I mean maybe in a big city, you can't see the stars that much, but you get out in the country a little bit and look up and we all see the same sky. It's great. Well, the sky here is going to be cool. We're going to have the Milky Way coming up right through here. Okay.
So we're going to be shooting the Milky Way doing that, but not just the ordinary Milky Way shot instead of just shooting a shot of Milky Way I'm going to set up a scene. Okay. We'll put a tent right here where we're sitting make a camp scene. Okay, cool. And we'll have that as foreground.
That'd be a pretty sellable shot, you know, adding a tent, hand of man, I mean, that goes a long way with selling the shots. You know, it's not just a sky scene And it adds another interesting element to the photograph which is what I'm always looking for in my images. You know, just something just a little bit unique not just the straight snapshot. Well, that's that's well and good but why do you have me out here in the daylight? We're doing night photography.
The thing about night photography. Well, one thing about it is at night, it's dark. Right. So you can't see what you're doing. Right.
Now if we were just coming up here and plopping a tripod down and just shooting the night sky, we'd be fine. But setting up the tent or any type of setup shot, if you can, you want to do it in the daytime. So we can get the whole tent set up. We can get the composition set up the focus, set, everything ready to go. And then we can just go back and just relax for a couple hours until it gets dark and come back and do our shooting.
Now, do we have to wait a while after a dark as soon as it gets dark? Well, now that it depends you can go ahead and shoot pretty soon after it gets dark. If you want to get some Twilight in the scene. Now we're going to have to wait until about 90 minutes after sunset for it to be completely dark so that we can see the Milky Way glaring above. Awesome.
Awesome. Well, I guess first step is setting the tent up. That's it. That's an awful lot of setup involved in night photography. Much more so than just shooting in the daytime.
Well, for some night shots. Yeah. Yeah. That's a big difference with the night photography is getting everything planned ahead. I'll tell you what one of the big differences is with night photography.
What you see is not what you get. Right. Right. You know, the long exposures that we use, the high ISOs the wide open apertures, all of that conspires to make the image look completely different than what we see with our eyes. So we have to plan ahead.
We have to think about what's going to happen with the image. Pre visualize everything This set up, that I'm doing here is already in my mind. It's not something that I'm out here just experimenting with I know what this is going to look like. It's all planned ahead. I just hope I can execute it.
We'll see how half of that goes. It's looking good so far. Well, yeah, well, I hadn't even taken a shot yet. All right, now I wanna make sure I get this tripod good and stable. So we'll get this.
Even when you're shooting with the wide angle lens like I'm gonna shoot this at 14 millimeter. So even at wide open at F2.8. I can still have enough depth of field to get the tent and the sky. But the other thing that I can do, and I do this a lot is actually shoot two separate exposures, one for the sky one for the tent, which what I'm going to do tonight here and for the tent shot, I'm going to focus on the tent for the sky shot I'm going to focus on the sky. Gotcha.
So don't have to worry about depth of field issues at all. Okay, now. I'm set up, got the composition, got the focus set. I need one more thing. A human element.
This is a tent scene. You know, I need a camper. Don't you think? Alright. Here's what I need for you to do get over there stand in front of the tent.
Now I want you to sit in this about right here. Let's say. I'm just going to knock this little guy in there and this is just a prop so we really don't care what it's pointed at or what you're looking at. In fact, the lens cap is still on it. That's not even going to matter because really we're just doing a silhouette here, right?
The idea is to have you silhouetted in front of the tent. I'm going to go inside the tent. We'll set up a flash inside of the tent. Okay. With a yellow orange gel on it.
So that it looks like, you know, like a camp lantern or something like that. I'm going to pop that flash. You're going to be silhouetted and going to be famous. Cool, all right, let's do it. Just look in through here, but now I got to get back and look through it.
Cause I gotta make sure we don't have any mergers. Make sure your head's not above the tent and all that good stuff. So you look through, let me see what that looks like. Okay. Ha.
After five years of wild photo adventures you're finally going to be a star. We got it. That's it. All right. Good.
Well, Kevin, it looks like you've got pretty much everything ready. You didn't lie. There won't be much room here for me unless you want me sitting on top of you to get this shot. I don't even want you sitting beside me. Well I'm not I'm going to get my tripod and I'm going to get a shot over here I believe.
That's going to make a nice shot right there just with the trees. I mean, this is a nice element with the tent when the human element, but I think, you know just using the trees and the sky and the mountains. Just don't forget you're gonna have to take a break long enough to be my model. Don't worry. I will.
Okay All right. I think this is going to work pretty good. Cable release, we're going to be dealing with long exposures tonight. So be sure that you've got a Cable release handy that takes out any possibility of camera shake. And whereas Kevin was focusing on for the tent.
He was focusing on the tent. I'm mainly concerned about the night sky and then the trees are going to be my foreground here. So I'm going to focus on the trees, which are, Oh I don't know, 40 yards, 50 yards from me that should give me a really nice framing to the bottom portion of my sky. So I think I'm set up here. Well, Kevin just dawned on me.
We did all the setup. And set up the tent, we've got our tripods out and we've chose the location but how do you even know the Milky Way is going to occur there? Today there is no excuse for anyone, any photographer not knowing sunrise, sunset, where the planets are going to be, where the Milky Way is going to be, moon phases, all of that stuff. There's tons of information on the internet. There's apps out there.
There's software free stuff that you can get. So just spend some quality time on there and get the stuff and you can figure it out. Like I know tonight Milky Way when it gets dark, is going to be right there for you a little bit later, it's going to move over here. It's going to be right behind the tent. Awesome.
Awesome. Going to work out. I'm looking forward to it. I guess it's just a waiting game now. You still got a little bit daylight.
Well the sun has set, has gotten nice and dark now, you know, we're ready to shoot this. I'm getting, I'm kind of excited about this. You know, I don't do a lot of it, I do some nighttime photography, but you know it seems like an awful lot of work we've gone through just for one shot. It is a lot of work, but you know sometimes that's what you have to do to get the shot. But in this case it's not just one shot we're talking about.
I'm actually going to shoot several shots for this. After I do the shot with you in front of the tent and you moved out of the way, then I'm going to set up and do star trail sequence where I'll do continuous exposures so we have the star trails in the sky. Blur them out, yeah. Then I'm thinking I might even actually leave the tripod set up here. I mean, it is my front yard so I can do it.
And come back in a couple of weeks we've got a meteor shower coming up. Okay. So may I'll put the camera back on it. The composition's still all set. And then I'll shoot with the meteors in the sky.
And I can have the tent put in there. Well, you know, take us through your techniques for how you shoot these type of scenarios. Okay, it is, it is a lot of work to get everything just set up. and you have to be careful about what you're doing. You have to watch every tiny little thing and just make sure, because I tell you you get one thing wrong and you miss the shot and what I'm doing here, as I mentioned earlier, I'm doing this in two different exposures.
I'm doing one shot for the tent. One shot for the sky. The tent shot, I focused on the tent and I'm going to be shooting that at ISO 200 aperture of F8. And I'm putting the shutter on bulb because the shutter speed doesn't matter. My exposure here is going to be the flash that's going to go off.
I've got a radio remote, the flash is inside the tent, set to wide angle, and I've got a yellow gel on the flash. I'm going to use this radio remote to fire the flash. And when the flash goes off inside the tent Doug is going to be sitting between the camera and the tent. So he's going to show up as a silhouette. So that's going to be the exposure for that.
And since I'm on bulb, then after that goes off after I fired the flash then I'll just turn the shutter off. After we get that shot and Doug's moved out of the way then I'm going to refocus on the sky and I'm going to change my exposure settings for that. For the sky shot, because I want the sky and the Milky Way to be as bright as it can be, I'm going to change my aperture probably to wide open to 2.8, I'll set the, at the ISO to 1600 or maybe 2000. Sometimes I go up to 3,200 if there's not a lot of light pollution and I'll set the shutter speed to about 30 seconds. Now I'm shooting with the 14 millimeter lens.
So I can get by with that without having the star streaking too badly for that. And another important thing that I've got that you can't see here but I've got the focus on my lens, taped shut. I put tape over it with gaffers tape so that I don't accidentally changed the focus once I get it set for what I'm shooting. And that is very important because there was a lot of gremlins that hang out in the night that can just really screw everything up. Then when I do the star trails, after we've got this shot now I'll set the different exposure settings for that for that are probably go with ISO 400 and aperture of F4 and a shutter speed of four minutes.
And I'll just shoot continuous exposures and try to get maybe about 30 of those and put those together. So I got a couple hours worth of star trails going in there and that will be blended in with the tent shot. And that's the whole idea. Try to get as many shots as you possibly can but you got to watch all of those individual settings for everything and make sure everything is just perfect. Okay, Doug, I'm ready to make you a star get in front of the tent.
Doug, sit still don't move. Look through the scope. All right. Gotcha. Okay guys, kill the lights.
All right. And one more, one more. We're going to do one more. Okay. Good.
Good, good, good. All right. All right. That's good. All right.
You can go and do your own thing now. I'm going to refocus and do the sky shot now. Okay. There are two ways you can do your star trail exposure. You can shoot multiple short exposures or you can shoot one long exposure.
The problem with the long exposure with the digital camera is that it shows excessive noise. So what I do is I shoot a lot of shorter exposures and I just stack them as layers in Photoshop. If you don't have Photoshop there are a number of softwares available. Some of them free that will do the job for you. It's actually very simple.
Finally, Kevin's going to let me shoot a little something tonight. You know, when you're out here doing these types of things it gets a little bit crowded when you're trying to shoot the exact same scenes, but this one I think will out really nice too. You know, really, as far as settings go my settings aren't that much different than what Kevin was doing. The only differences that he is incorporating, you know the hand of man using the, the model, and the, and the tent, but for this shot I really want to tell a more natural story. And so I've just had the night sky and the Milky Way.
And then I'm using, as far as composition is concerned I'm using the tree line and the mountain range in front of me across the bottom part of the frame. And that's kind of an anchor point, you know so many times you see just straight up shots of, you know the night sky with nothing but stars or a moon or the Milky Way or planets or whatever. And, you know, sometimes it gets a little bit boring. So having that other little interest point really kind of helps add something to your photograph. So when we're trying to determine the exposure for the shot, you know, you're going to be in the range of 25 to 30 seconds for your shutter speed.
And you're going to be using the aperture in the range of 2.8 to F4, somewhere in there. Now, depending on the camera you're going to be using ISO range of between 1,600 and 3,200 and it's going to take a little practicing and a little, you know, trial and error to get those right. And a lot of times like what I'm going to do tonight, I'm going to bracket I'm going to try several different settings and see what I like best. So I think we've got everything ready. We, we already set the camera up and got our focus and our composition right before the sun went down.
And so all we gotta do is take the shot now. So let's see what we got, of course, using a cable release. And I'm trying not to touch the tripod or the camera. Cause these are very long exposures and the slightest little bump can, can cause camera shake which is going to blur your image. So, all right, guys if you already let's go ahead and kill the lights.
Oh yeah. I think that worked out good. Oh yeah. Yeah. I like that.
Good job. Yeah. You know, folks, whenever you're out shooting these types of shots, don't just take one shot and leave. I mean, it's an awful lot of work just to get set up for one shot, take advantage of the opportunity use different lenses, different focal lengths and even turn the camera vertical. You know, you can drastically change the way the image appears just by, you know, a few little adjustments.
Just doing something a little bit different. Yeah. Speaking of different, you know tonight we've been shooting this new moon so we got all the stars in the sky and all like that. Why don't you come back in a couple of weeks when the full moon is out and let's try something different, see what it looks like. Yeah.
That would be cool.
Share tips, start a discussion or ask other students a question. If you have a question for an expert, please click here.
Already a member? Sign in
No Responses to “How to Take Pictures of the Night Sky: Beginning Set-up”