Simple Tips to Blend Images
Ian Plant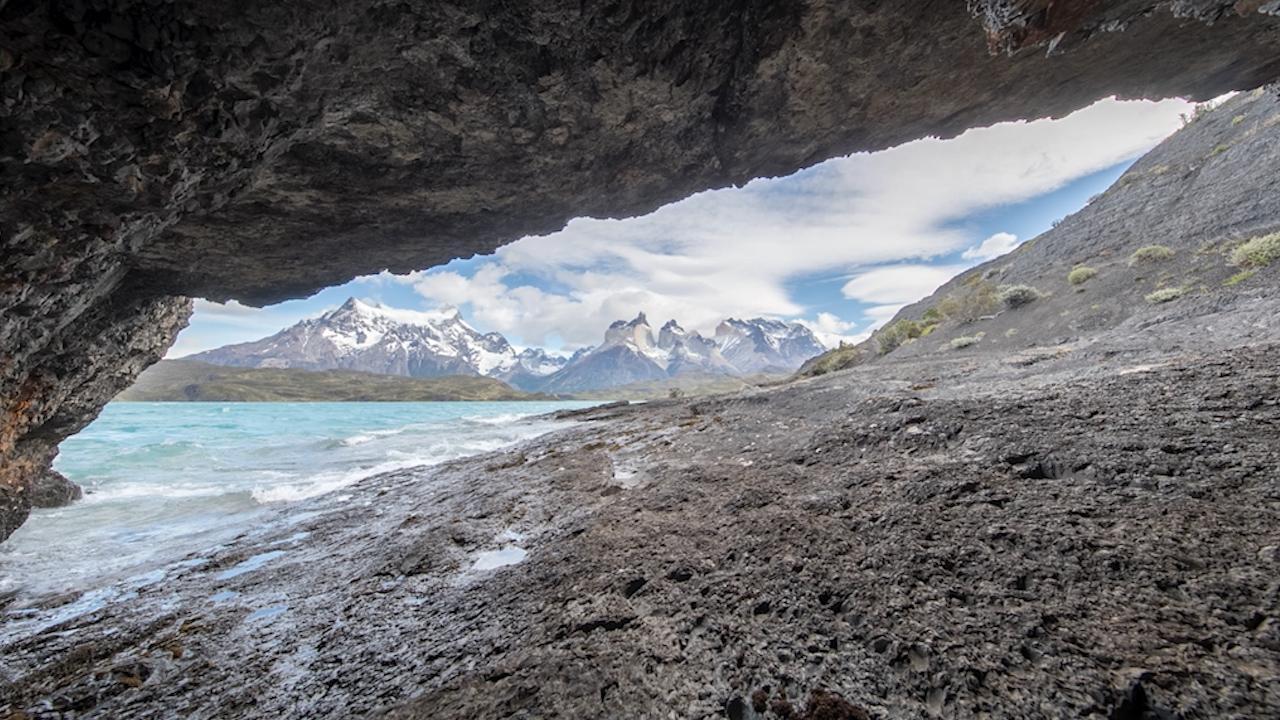
Video Player is loading.
You’ve probably been in this predicament. You are photographing a scene where the dynamic range between lights and darks exceeds your camera sensor. For instance, your scene includes a bright sunset sky and the landscape below in deep shadows. The normal solution is a graduated neutral density filter. However, this device doesn’t work if you are composing with an ultra wide lens.
In this free video, world renowned outdoor photographer Ian Plant tells you how to overcome this problem with simple image blending. To blend images in the editing software, you need to take several exposures. One is optimized for the highlights, making sure to avoid overexposure. Another includes all the shadow detail to avoid underexposure. A third exposure covers the mid-range data of your image. Ian shows how to blend images with his three static photographs of same scene, a National Park cave in the Patagonia region of South America.
The software program to blend images resides in Adobe Lightroom. It’s called Merge To HDR. With a few simple steps, it merges his three images and creates a single preview image. Lightroom then gives him the option of auto align and auto tone. Next, Deghosting will correct any errors in motion, for instance moving clouds or splashing waves. These final corrections create a single DNG format RAW image file from his three source files. To blend images for fine tuning the final HDR file, Ian goes into the Develop module where he uses the Tone tool to make minor adjustments such as contrast, whites, and blacks. The final result is Ian Plant’s beautiful South American scenic created by using Lightroom’s Merge To HDR to blend images together.
When you're photographing a scene, where the range between light and dark exceeds the dynamic range of your camera sensor. Then a lot of photographers use what is known as a graduated neutral density filter. Which is a filter that's darker on the top than it is on the bottom. They pull it down in front of their lens and that allows them to balance the exposure. Say for example, if you have a bright sunset sky and then you have a landscape below it in shadow.
But when you're using an ultra wide lens for example with a bulbous front end, filter use might be difficult or impossible, or you may be confronted with a scene where there's not an easy transition between light and dark that fits the graduated filter. So for example, with the shot I've got here on my computer which I took in Torah Del Panay national park in Chile in the Patagonia region of South America. I was inside a small cave that I found on the shore of a Lake. And I was shooting the mountains in the background and the mountains, of course outside the Cape were very bright. They were in the sunlight whereas inside the cave, it was very dark.
So I couldn't use a graduated filter on this to to balance the exposure. When you're blending exposures, What you want to do is you want to take several different exposures. You want one exposure, that's optimized for the highlights. So that exposure, is making sure that the brightest parts of the image aren't overexposed. And then you take another exposure for the shadows.
And that is ensuring that the darkest parts of the image aren't underexposed. So when the shadow exposure, you're going to end up with a shot that has the highlights overexposed blown out. And also with the highlight exposure the shadows are going to be perfectly dark. They're going to be pure black. And sometimes depending on the extreme range between shadow and light, you might want to have a few exposures in between just to give the computer more data to work with to create a seamless blend.
So here I've got three different exposures. All of the same scene, shot them on a tripod. So there was no movement between exposure. I've got one, that's optimized for the highlights. So you can see that the shadows are all dark.
I've got one middle exposure in between the two extremes and then one exposure that's optimized for the shadows. You can see the highlights are overexposed. And now I'm going to blend the three of these images together using Adobe Lightroom. And this is a really simple process. There's a lot of different ways you can blend multiple exposures together.
You can use what is known as a high dynamic range or HDR program that can blend the exposures together. You can hand blend the exposures using Adobe Photoshop but that gets rather complicated because you need to learn how to use layers and masks or you can use this very simple merge to HDR and Adobe Lightroom. So with all three photos selected, I go to photo, I got a photo merge and then HDR and this will pull up the HDR merge preview window and light room is going to create a preview of what the final HDR image will look like. So now Lightroom has completed the preview and you can see, I have different options. The auto align option should always be checked.
This makes sure that if there's any movement between your images sale it let's say you're handholding your exposure blend. This will align the images and make sure that there isn't any discrepancies when it's pulling the files together. Auto tone is a box that you can leave unchecked if you want. When I take the box off, you can see that I've lost a lot of the detail in the shadow areas in this preview. That doesn't mean the detail's gone.
It just means that I'm going to have to manually expose the final HDR file, to bring up that shadow detail. I'm just going to leave the auto tone box checked right now. This is light room's attempt to automatically figure out how bright the shadow should be and how bright the highlights should be. But these are all parameters that I can change when I manipulate the final file that's created by this HDR merge. D ghost allows you to choose how much D ghosting you have and what the ghosting does is it attempts to minimize any discrepancies that are created by elements in the scene that are moving.
So if I have waves crashing on the shore, or clouds moving in the sky between my three exposures, D ghosting will attempt to avoid any weird errors that are created by merging those files together. So I'm going to keep D ghosting on high here because I had a lot of waves and cloud movement during my three exposures. And it's going to build the preview here. And so with the D ghosting set to hi, I have a new preview that gets rid of any errors that are caused by movement between exposures. And I'll just go ahead and press the merge button here.
And what lightroom is going to do, It's going to create a new DNG format raw file that combines the data from the three source files that I use to create this merge, to HDR final image. All right. Lightroom has finalized creating the new merged HDR raw file. I can go into the develop module and I can process this like any other raw file. So as you can see, what the auto toning option did is allowed light room to make its best guess at what my final development settings were.
You can see that there are settings already applied by light room. So I can go ahead. For example, I think that the shadows in the same as you look way too bright, I don't like that look. So I'm going to pull the shadows back down to finalize the image and I can bring down the overall exposure. I can change the choices that light roommate and auto tone.
So nothing is set in stone. I can then fully develop the file to my own particular tastes. So there you have it. It's a really simple operation using merge to HDR and Adobe Lightroom to blend multiple exposures together.

Share tips, start a discussion or ask other students a question. If you have a question for an expert, please click here.
Already a member? Sign in
No Responses to “Simple Tips to Blend Images”