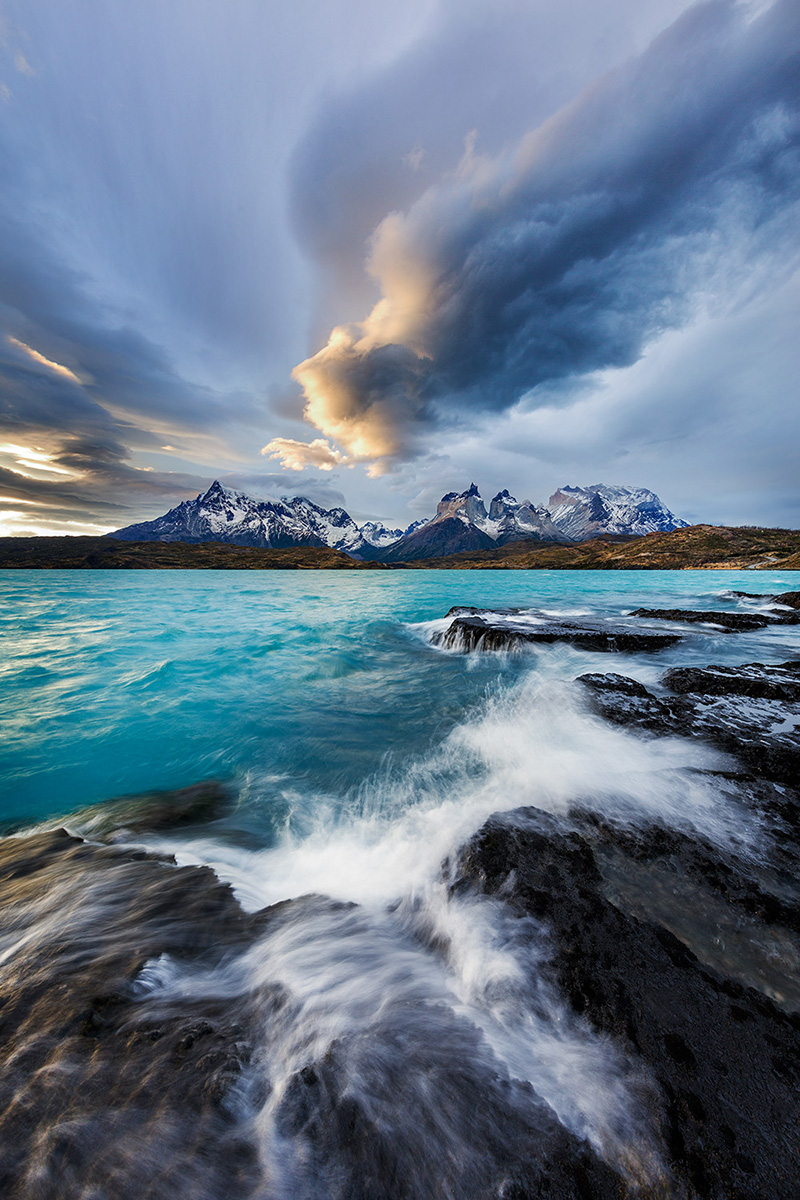
The Patagonia region of South America is one of the most stunning places on Earth – and Torres del Paine National Park in Chile is easily one of the most photogenic and easily accessible parts of Patagonia. I go there every year leading a photo tour, and every year this place makes my jaw drop to the ground.
On my last trip there, giant storm clouds built up over the mountains, so I reached for my ultra-wide Canon 11-24mm f/4 lens to capture the amazing sky and plenty of dynamic foreground wave action. Unfortunately, the contrast in the scene between light and dark exceeded the dynamic range of my camera. Typically in such a situation, I would reach for a graduated neutral density filter to hold back the exposure of the sky and match it to the foreground, but since the Canon 11-24mm lens has a bulbous front element, I wasn’t able to use a grad filter with the lens, so I blended exposures instead.
Exposure blending is a technique where the photographer takes multiple images of the same composition, varying the exposure in each image, and then later blends the images together using Adobe Photoshop or an HDR (High Dynamic Range) program such as Photomatix. The resulting merged exposure can capture a range of tones from dark to bright in excess of the sensor’s native dynamic range. Exposure blending in Photoshop is typically accomplished using layers and masks, and can range from being very easy to very complicated, depending on the complexity of the scene. Exposure blending (if done correctly) can often look more natural than using a grad filter. The downside of exposure blending is that it is sometimes challenging to achieve a seamless blend, especially when blending subjects such as water or wind-blown clouds that move between exposures. When working with ultra-wide lenses with bulbous front elements (such as my Canon 11-24mm), filter use is often difficult or impossible, leaving blending as your best or only option when using these lenses in extreme lighting situations.
For this composition, I took one exposure for the sky, preserving detail in the highlights, and one for the foreground, preserving detail in the shadows. I blended the two exposures together using layers and masks in Adobe Photoshop, and then made some minor adjustments to contrast and color to complete the final image.
About the author: World-renowned professional photographer and Tamron Image Master Ian Plant is a frequent contributor to several leading photo magazines and the author of numerous books and instructional videos. You can see more of Ian’s work at www.ianplant.com.
Have something to add to the story? Leave a comment or email editor@outdoorphotographyguide.com.

Based on the prolonged shutter speed of the water, can I assume that you used different shutter speeds on the two exposures or just aperture? Beautiful shot