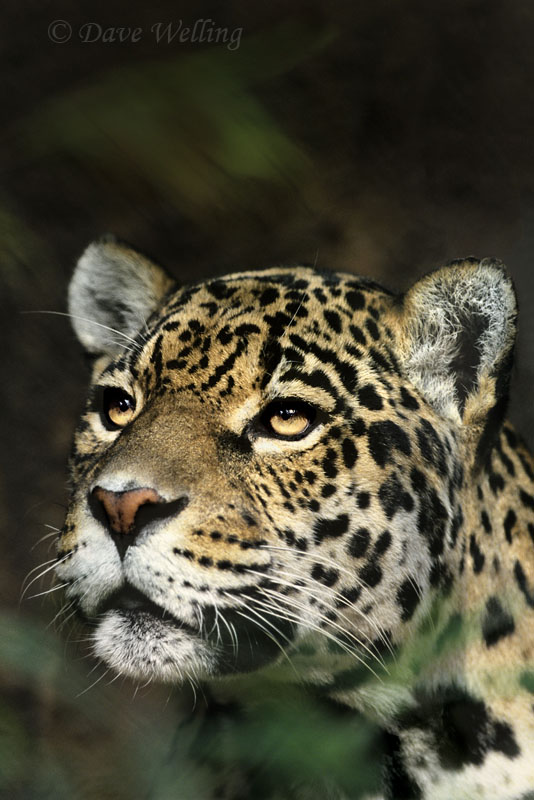
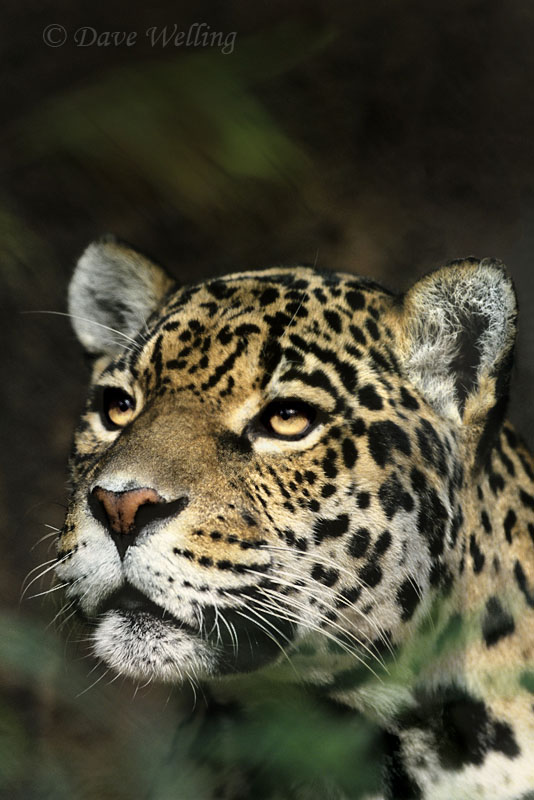
When photographing wildlife it is extremely important to keep the eyes of your subject in sharp focus, or your image will lose impact and appear dull and lifeless. Compare the two jaguar images below. Photo 1 has the focus point right on the right eyelid/eye and the eyes are sharp and the image is lively. Photo 2 has the focus point along the bridge of the nose just in front of the eyes. The eyes are dull, and even with shine, appear somewhat glazed over and lifeless.
Depth of field for sharp focus depends on several factors, including the focal length of the lens and the selected aperture. As you increase your aperture number (go from a small number/wide open aperture to a higher number/small aperture opening) your depth of field for a given situation will increase. As you increase the focal length of the lens (go from a smaller length to a longer length) the inverse is true. Your depth of field for a given situation will decrease.
As you go to the long and super telephoto lenses your depth of field for apparent sharpness can be just inches, even for the highest aperture number your lens is capable of. So, establishing your sharp focal point is critical for a striking looking image. Look for an edge around the eye, possibly where the iris and cornea meet or where the eyelid meets the eye. Keep this focus point as you compose and capture your image. If your camera has a focus lock button, establish your focus point and depress the lock button to keep the focus point even if you recompose slightly.
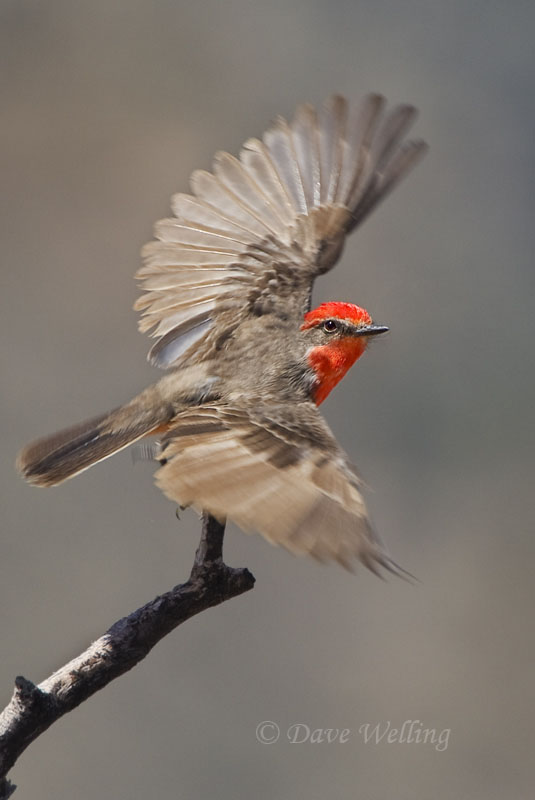
When you have a dynamic situation like the vermillion flycatcher taking flight in the image below, it becomes more challenging but not impossible. First, study your subject. Birds will often signal when they are about to take off with changes in position or flexing their legs/body. In this situation, depending on your camera sophistication, you have a couple of options. If your camera has follow or predictive focus, set your focus point on the eye and let predictive focus take over when you follow the bird as it takes flight. Remember to follow the flight in a smooth, flowing fashion and softly press the shutter, do not stab it. That will cause vibration and un-sharp photos. If you do not have predictive focus, set your focus point on the eye again, switch off your auto focus, give yourself extra space in the frame to let the bird fly into the frame and fire as the bird takes off using that same flowing motion. In either case, use a high shutter speed, preferably 1/1000 sec or greater, and high speed continuous shooting if available. If you can shoot high speed continuous, anticipate the bird taking off and press the shutter before the bird leaves the perch. You will get a sequence of shots, many of which will be unusable, but you will get your avian subject completely in the frame with no cut off wings.
Try these techniques on your next wildlife shoot to capture some stunning portraits!
About the author: Dave Welling is a full time professional photographer specializing in wildlife, landscape and nature with over 75,000 6×7, 6×4.5, and 35mm film and digital images. He has been capturing evocative images of the natural world for over 25 years, producing the highest quality images for publication. His images often capture unique behavioral characteristics of wildlife or special lighting or weather conditions of landscapes. You can see more of his work at www.strikingnatureimagesbydavewelling.com.
Have something to add to the story? Leave a comment or email editor@outdoorphotographyguide.com.
I have a Canon 5D Mark iii. How do I set predictive focus?