You may see articles on wildlife photography (including mine) mention "fill-flash" when discussing technique and how to improve your wildlife images. If it sounds a little mystifying to you, don't worry. It's not that complex, especially today with the tremendous interactive metering capabilities of the newer cameras and dedicated flashes. Before we get to the "how-to" let's consider the "why."
Common Problems with Flashes and Lighting
Why would you use flash for wildlife that you are photographing in bright daylight? Well, many of you have photographed your relatives at a picnic or other bright sunny day situation. Remember how their faces, shaded by large hats or trees, had deep, dark shadows? That was your camera's electronics trying to compensate for the wide tonal range of your relatives bright shirts and blouses and dark, shaded eyes or faces. Even digital cameras, with their extended range of tonal stops, cannot compensate for some of those extremely bright situations.
Some of you may also question photographing wildlife in bright sunlight. After all, don't all the wildlife photographers push photographing in the early morning or late afternoon when wildlife is usually more active? Well, that's generally true. But, wildlife subjects don't always cooperate with the golden light. Sometimes they come to water in the middle of the day, so you need ways to reduce that tonal range to make your images better. Also, wild animals have this really bad, inconsiderate, habit of not showing up with the sun not in front of them but with the sun off to the side or even almost behind them. Their bodies may be brightly lighted, but the face or eyes may not be.
What do you do? You could take multiple images using bracketing and use HDR tricks to combine images and reduce the tonal range if your wild animal subject freezes long enough - not too likely. Or, you could familiarize yourself with fill-flash and use this technique to improve the quality of your images.
The Fill-Flash Technique
Look at these two images of the whitetail antelope squirrel. I took these in late morning as I got back to my car after a long hike in Joshua Tree National Park. I had been looking for lizards and other desert reptiles so I had my "long" wildlife lens on my camera. This little guy ran out in front of me, almost under my car, to steal seeds laying on the walkway. He would stop in the middle of a group of flowering desert dandelions and quietly chew away while watching me. Don't know about you, but it's hard for me not to photograph a squirrel like this. But, I had bright, late morning desert sunlight: enter my flash.
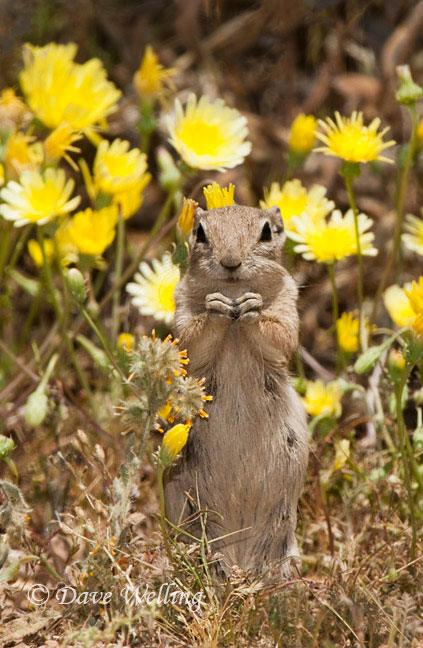
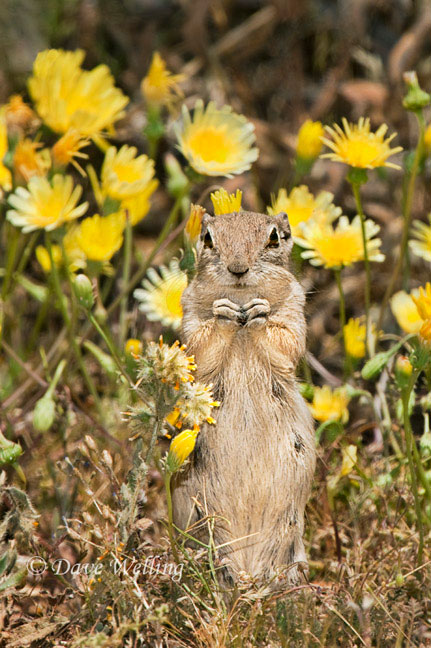
The top image is without flash and you can see the body and face of the animal are dark with minimal color pop while the bright flowers in the background almost overwhelm the squirrel. The image directly above was taken with fill flash at - 1 1/3 setting on the flash. I exposed for the overall scene's ambient light and then dialed in -1 1/3 on the flash menu. That way meant I would not get a dark background often associated with wild animals photographed with full flash in a bright environment. There is more detail in the squirrel in the second image and the color intensifies slightly making the overall image more pleasing to the viewer.
Try photographing various subjects (could be plants, trees, flowers, birds, etc. for this test) using different ambient light and fill-flash settings to find the settings that work best for you.
About the author: Dave Welling is a full time professional photographer specializing in wildlife, landscape and nature with over 75,000 6x7, 6x4.5, and 35mm film and digital images. He has been capturing evocative images of the natural world for over 25 years, producing the highest quality images for publication. His images often capture unique behavioral characteristics of wildlife or special lighting or weather conditions of landscapes. You can see more of his work at www.strikingnatureimagesbydavewelling.com.
Have something to add to the story? Leave a comment or email editor@outdoorphotographyguide.com.

What would be recommended for pet outdoor photography during the day? Should I still use flash?
An interesting discussion is worth comment. There's no doubt that that you ought to write more on this subject, it may not be a taboo subject but typically folks don't talk about such issues. To the next! Best wishes!!
Both images appear to have been taken with flash, the first an a very low setting, and the second at 2x or 4x the power of the first. I say this because of the shadow cast from a couple blades of grass on the lower part of the squirrel.
It is truly a nice and useful piece of info. I am glad that you just shared this helpful information with us. Please stay us informed like this. Thank you for sharing.
Every weekend i used to go to see this site, as i wish for enjoyment, as this this web site conations genuinely pleasant funny information too.
This is a really good tip particularly to those fresh to the blogosphere. Short but very accurate information… Appreciate your sharing this one. A must read article!
Another testomony to the fact that investing without an schooling and analysis will ultimately result in regrettable funding decisions.
Thanks for finally writing about >Fill-Flash for Wildlife Photography | Outdoor Photography <Loved it!
I think that is among the most vital info for me. And i am glad reading your article. But wanna observation on few normal issues, The website taste is wonderful, the articles is really great : D. Excellent activity, cheers
the venus factor scam