I’ve often found myself in the field working in fast-changing lighting conditions. When a high shutter speed is necessary to capture moving subjects, constantly having to monitor and change my ISO slows me down, and sometimes means I miss capturing a special moment. In situations such as this, I switch my camera to Auto ISO. If shooting in Shutter Priority mode, I can set my shutter speed to the minimum I need to ensure sharp photos. My camera will then pick an ISO to ensure it maintains that shutter speed, no matter what is happening with the light.

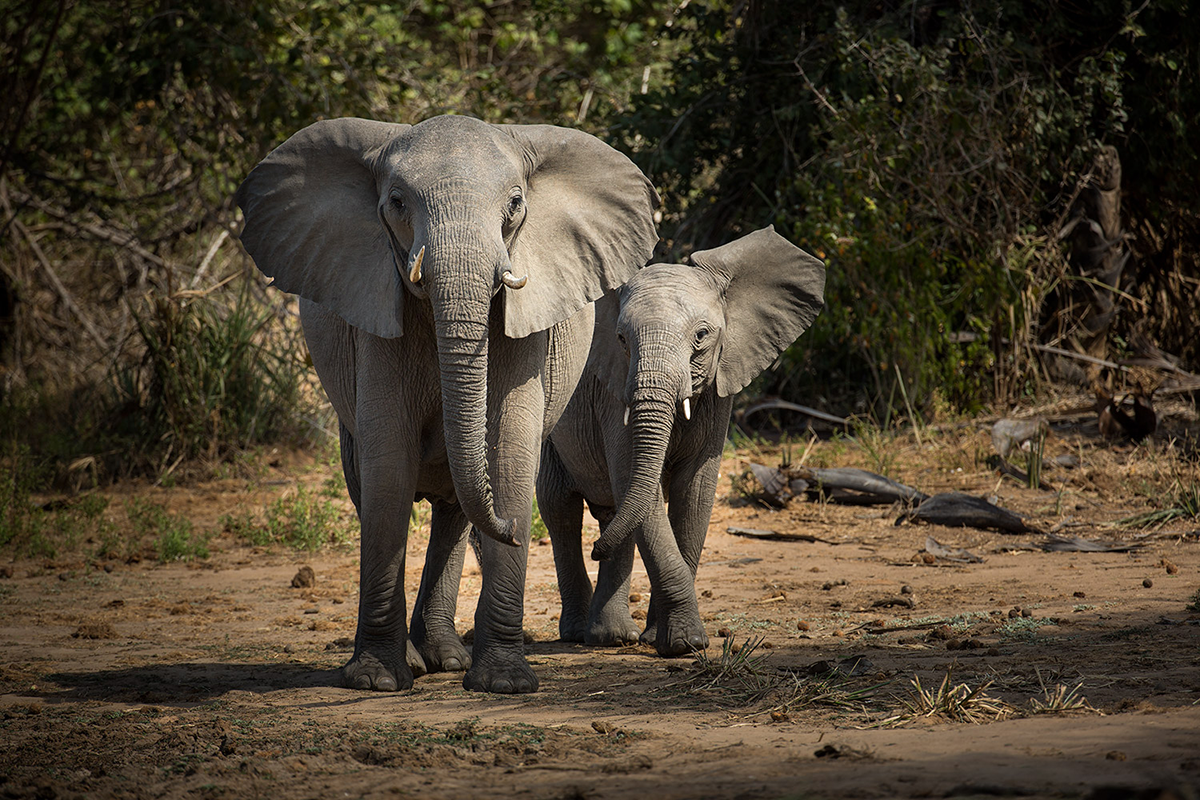
For example, with this photo of a pair of elephants coming straight towards me at a rapid pace in Zambia’s Lower Zambezi National Park, Auto ISO allowed me to capture this picture-perfect moment, even though the elephants were moving through constantly changing mixed shadow and light.
What is Auto ISO?
Auto ISO is a feature, common to most digital cameras, that allows the camera to automatically pick an ISO for each shot. You can use Auto ISO in Manual, Aperture Priority, or Shutter Priority mode, but it is probably most useful when using Shutter Priority mode. In Shutter Priority, you can pick the optimum shutter speed for your subject, and let the camera pick the aperture and ISO.
The default for shooting with a combination of Shutter Priority and Auto ISO is for the camera to choose the largest possible aperture first, and then increase ISO as necessary to maintain the desired shutter speed as light levels drop. For most action photography, such as wildlife and people, a shallow depth of field is often desired, but if you need a smaller aperture for more depth of field, consider shooting in Manual mode which allows you to set both shutter speed and aperture, letting the camera only pick ISO as a floating variable.
When Not to Use Auto ISO
Auto ISO is typically not ideal for types of photography that doesn’t involve capturing quick action, such as landscape, architecture, and other types of photography where aperture and depth of field are more important than shutter speed. These types of photography are often conducted in low light, and if you are working with the camera securely on a tripod, you don’t need to worry about having longer exposure times. In such circumstances, Auto ISO would try to pick a higher ISO for the low light, introducing unnecessary digital noise which compromises image quality.
Related Video: How to Choose a Tripod
Also, if you are shooting wildlife or action (where you need shallow depth of field) and working in extremely bright conditions, keep an eye on your camera settings, as the camera will select smaller apertures to maintain your chosen shutter speed if it has already selected the camera’s lowest ISO setting. In such circumstances, you might need to increase your shutter speed to be able to use larger apertures, or turn off Auto ISO altogether.
Capturing Action: Perfect for Auto ISO
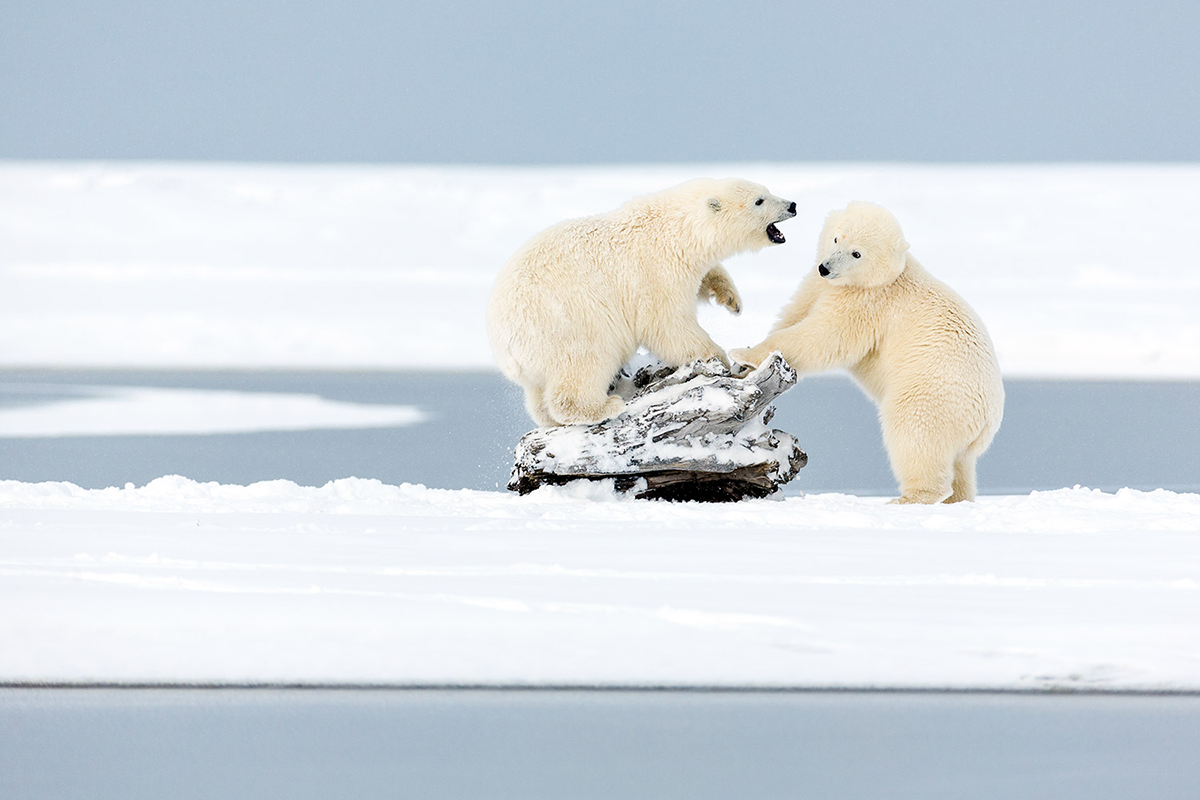
When you are trying to capture moving subjects, especially when working in fast changing or low light conditions, Auto ISO can mean all the difference between missing the shot and nailing it. For this photo below of two polar bear cubs playing in the Arctic National Wildlife Refuge of the USA, I was working in mixed clouds, and light levels were changing rapidly and without warning. With my camera set to Shutter Priority to ensure I had a fast enough shutter speed to capture the action, Auto ISO automatically picked an aperture and ISO to maintain my shutter speed as the light changed. I used exposure compensation as necessary to ensure the proper exposure level.
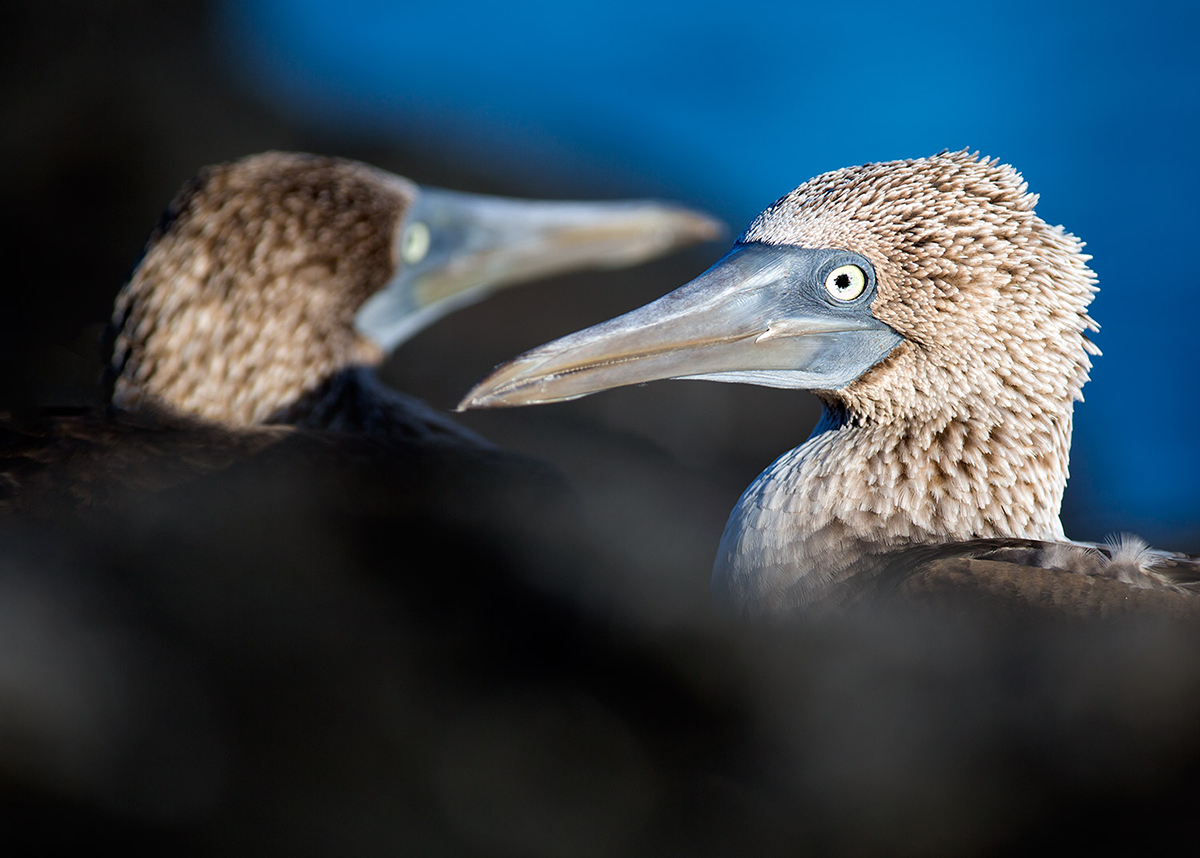
And for the image below of a pair of blue-footed boobies in Galapagos National Park, Ecuador, even though the birds weren’t moving, my boat was getting tossed about in the waves. Shutter Priority and Auto ISO were the perfect combination to ensure I got the shot!
But what if the camera chooses a ridiculously high ISO?
If you are working in very low light, you might end up with extremely high ISO settings, creating images with too much noise to be usable. Most cameras allow you to set an upper limit to the ISO your camera chooses when working in Auto ISO mode. But I say, why bother? If you
limit your ISO range, then you won’t be able to take the photo at all; I’d rather keep shooting, and decide later if the image is usable or not. One thing you can do to avoid high ISOs and still keep shooting is to compromise and lower your shutter speed – it may mean you miss some shots because the subject is too blurry, but with any luck, a few will come out sharp.
Conclusion
Auto ISO is a very useful feature when photographing wildlife and action, especially in fast-changing or low light situations.
About the author: World-renowned professional photographer and Tamron Image Master Ian Plant is a frequent contributor to a number of leading photo magazines (including Outdoor Photographer, Popular Photography, and others). You can see more of Ian’s work at www.ianplant.com.
Have something to add to the story? Leave a comment or email editor@outdoorphotographyguide.com.
Good article. shows the when and how to use Auto ISO. Usually, you only get the How, but the When is even more important to Understand.
On my Canon R7, I use Auto ISO with the Fv (Flexible) mode. This allows me to have all the features of manual, Av or Tv in one mode. I know a lot of people are concerned with high ISO, especially those of us coming from a film background. However, modern camera sensors can handle a lot more ISO than we expect and postprocessing tools are so good at mitigating noise that, as the author notes, I would prefer having a noisy shot than no shot at all.
Nice article! I plan to give Auto ISO a try today. I am shooting a High school girls Basketball game.
<a href="https://t.me/ozempik_kupit_bezpredoplat" rel="nofollow ugc">оземпик цена</a> - саксенда купить шприц, оземпик 0.5
When in S mode at 1/1000th, what "minimum" shutter speed should be specified, or doesn't it matter since the user-specified shutter speed will always over ride any "minimum"?
great article and I started using this technique in my bird and other wildlife photography and it is great for what I shoot
I think auto ISO is not really practical for crop cameras that cannot handle the noise of iso over 800.
Hi Ian, Great article. Spot on! I use auto iso in fast paced action scenes, fast light changing conditions and when I have the camera next to me in a car ready to shoot if some scene would suddenly occur. Especially in the latter you don't want to spend time to setup your camera. It should be ready to shoot. I am using Nikon (D810) and the feature that I like is that within auto iso I can set the "sensitivity". Sensitivity sets the minimum shutter speed at any focal length. The default is 1/focal length (eg 200mm lens will keep the shutter speed on or below 1/200sec). When increasing sensitivity it will keep the shutter speed below 1/2xfocal length (eg 200mm the shutter speed will be 1/400mm or faster). The iso will be adjusted accordingly. I am using this in aperture priority mode. So set my aperure between at 2.8-5.6 to blur background, iso auto with sensitivity up one (@200mm max shutterspeed is 1/400sec). This way I almost have all shots tag sharp and can focus on the subject instead of camera settings! Of course when working on "slow photography" from tripod etc. I am using fixed iso (mostly 64iso in aperture mode to control depth of field and realize ultimate sharpness and long shutter speeds).
Great examples of using the Shutter Priority mode to capture movement with the constantly changing shadows and light. I will now use this -- I have been using the Aperture Priority mode most of the time because of the changing light conditions and neglected photo opportunities because of the movement of the subject.
Why do the newer cameras even offer such high ISOs. At what ISO setting does the noise start to make the image unusable?