One of the best parts of traveling is the photos you come home with. The quantity and quality of the photos is directly related to the amount of preparatory work that you perform before ever leaving on your adventure. There is nothing worse than visiting a once-in-a-lifetime location, and coming away with less than impressive shots.
Join me as I prepare for my next trip, sharing with you tips that will significantly improve your chances of coming away with stellar shots on your own adventures!

Get a feel for your destination
On my upcoming trip, I will be shooting mainly cityscapes, street photography, and other travel related shots. I will be visiting Nuremberg, Regensburg, and Passau, Germany, Krems and Vienna, Austria, and finally Budapest, Hungary. It will be my first time visiting Nuremberg, Regensburg, and Krems, having visited the remaining cities just last year. My research for those cities is still pretty much up-to-date, so I won’t need to do much for them. The three I haven’t visited will definitely get the most attention.
When researching a city for the first time, I start with a simple internet search of the city. I often start with the Wikipedia page to get a general feel for the city’s history and main attractions. I will also do a basic search for what the average temperatures and weather information for the time period I am visiting, so I know what to pack. Basic sunrise and sunset information is gathered but is explored much more in depth later. Articles like “If you have only one day to spend in (insert city here)” are great places to start as well.
Related course: Taking it to the Streets: An Introduction to Street Photography
I personally like to take a quick scan of the images that are associated with my city searches. It gets me excited and helps me to start to prepare for what I want to shoot. I have talked to other pros that absolutely do not want to see any images of where they are visiting. Their reasoning is that they don’t want to influence any of their artistic choices once they are onsite. There are no right or wrong answers here, just ones that will work for your own specific way of shooting.
Dig deeper into the details
Once I get the general information for a city, I then start to dig deeper. At this point, I know what general attractions I will want to shoot. What I don’t know are if they are any restrictions regarding photography. Will I be able to set up my tripod in St. Lorenz Church in Nuremberg? Now is the time to figure it out so that I don’t lug it around all day just to find out I can’t use it! This goes for construction as well. I knew upon visiting St. Stephen’s Cathedral in Vienna last year that is was under repair and that there would be scaffolding on one half of the building. That not only lessened any disappointment, but I knew going in that I would need to shoot from a certain angle to avoid seeing it.
Related article: Things to Consider When Traveling Internationally for Photography
The goal of this deeper research is to find the special places that aren’t on the tourist maps. One of the best ways to do this is to ask photographers local to the cities you are visiting. For example, I will be reaching out to a fellow photographer I met on a photo workshop who was born and raised in Nuremberg. Go through your contacts as you never know where they will lead you!
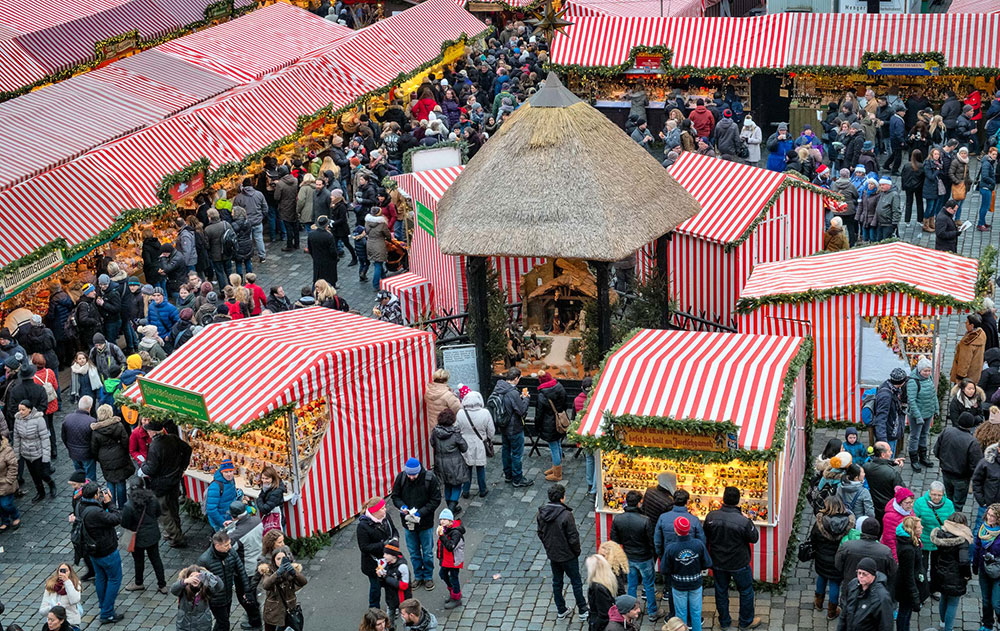
Another way to find locations to shoot is to look for listings of festivals and events. The main purpose of our visiting Europe in late December is that my wife and I love exploring the Kinderfest holiday markets. They are open air markets where the locals come to enjoy great food, beer and wine, and each other’s company while celebrating the holidays. Without further research I would not have known that in Vienna there is a multitude of Kinderfest markets, not just the main one outside of the Rathaus (city hall). We were able to visit five markets during our day in Vienna last year because I dug deeper.
Make a plan and stick to it
At this point, I know “what” I want to shoot (at the very minimum at least), and I begin to plan the “when and where.” I find it helpful to see where the locations I want to shoot are located on a map. It helps me put in perspective time and distances, as well as the feasibility of getting it all in. In the case of our upcoming trip, we are going on a river cruise so we have no control over the location of our hotel. Sometimes we are right in the middle of things, (as in the pano of the Chain Bridge in Budapest which was taken from the top deck of our ship), and sometimes we are a public transportation ride away from the city center. Plotting your shoot locations will help determine where your hotel should ideally be!
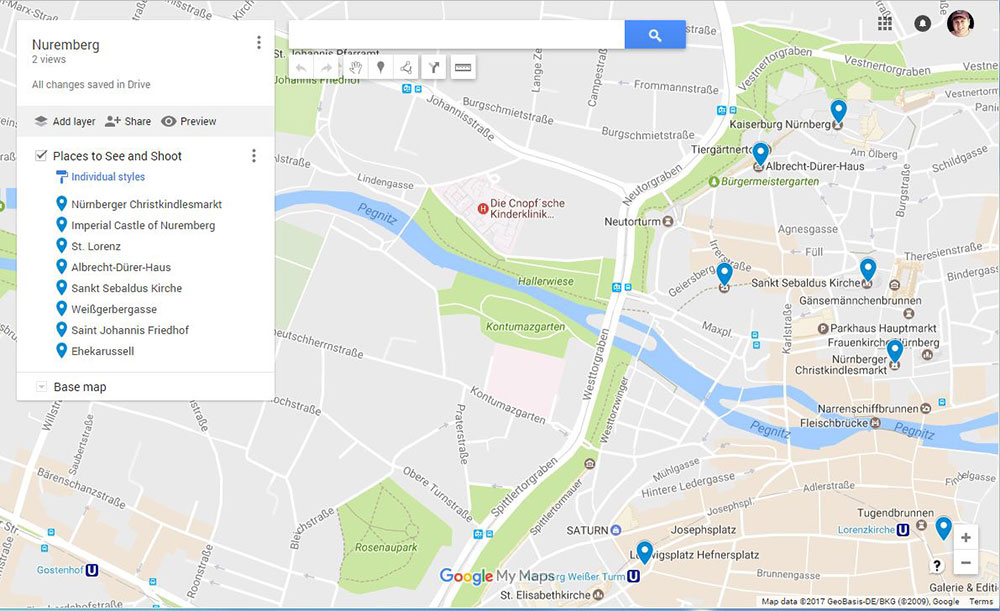
In order to keep all these sites straight, I plot them onto a Google Map then create a personal map and download it to my phone. Depending on your carrier and data plan, accessing cellular networks in foreign countries can not only be a challenge but expensive. Keeping a copy of my map on my phone eliminates these concerns. While I am plotting the locations I want to visit, I also take the time to look at street level 3D view if it’s available. This gives me a head start on knowing where the best angles to shoot will most likely be. When combining a vacation with work, like I am with this trip, it helps keep the amount of time I need to spend at each site to a minimum. (Especially if you will have non-photographers in tow on the trip… Happy wife, happy trip!)
Taking the location planning a step further, I will also consult The Photographer’s Ephemeris to look at information for the sun and moon for the cities I will be visiting. This app gives me all the information I need for the rising and setting of each, as well as where in the sky it will appear in relationship to my location. It is an invaluable tool for getting those special shots where the sun or moon is located perfectly for a landmark.
Pack, pack, pack
I am just a few days out from my trip so it’s time to start packing my bags. A good place to start is to review your airline’s size and weight restrictions for your baggage. I will be checking one bag and carrying on one bag, as well as my camera bag. I won’t bore you with what’s going in anything other than my camera bag as I’m sure that’s what you’re most interested in!
Related video: Selecting the Best Camera Bags for Outdoor Photography
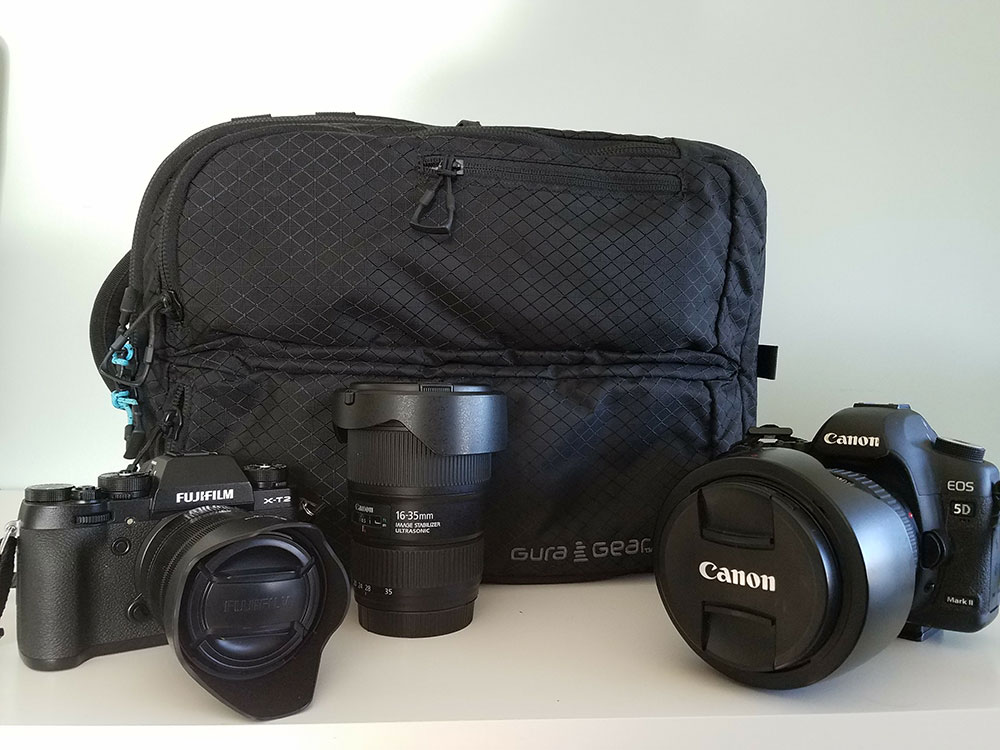
For this trip, I will be bringing two cameras along: my trusted Canon 5D Mark II as well as my recently purchased Fujifilm XT-2. I can’t stress this enough: always bring a backup camera, even if it’s just a point and shoot or camera phone! There is nothing worse than going on a grand adventure and not being able to capture your special moments.
I plan on shooting cityscape panos at both sunrise, sunset, and blue hour, so I will be bringing both my Canon 16-35mm (f/2.8L) wide angle lens as well as my Canon 24-105mm (f/4L) lens. Since I will be shooting in low light settings, my tripod, shutter release, and headlamp will be added to the bag.
A quick tip regarding your tripod and ball head: I have a full-size tripod and it will not fit in my camera bag. If the airline doesn’t allow it to be strapped to the outside of my bag, I remove the ball head and place it in my camera bag, and then put the tripod in my (locked) checked bag. I do this because it’s much easier to purchase a tripod while on vacation than it is to find a complete tripod and ball head set.
I intend to use my mirrorless XT-2 (18-55 mm f/2.8-4.0) as my daytime running-around camera. It is about a third of the weight of my Canon DSLR, and it easily outperforms it in high ISO shots. It’s perfect for interior shots, which will comprise the majority of my daytime shooting. The fact that it is much smaller in size and absolutely silent will allow me to shoot candid street photography shots easier as well.
Related video: Everyday Items that Belong in Your Camera Bag
Other items that make the cut for getting into the bag are extra sim cards, batteries, and chargers for both cameras. I will be needing to do some post-processing while I am on my trip, so my laptop, portable hard drive, power supply, and two (again a backup) USB cables to transfer photos from camera to computer will be packed. Finally in my bag will be the miscellaneous lens cloths, blowers, and camera rain bags I always keep on hand.
Not making the cut this time:
- My Tamron 70-300 mm (f/4.0-5.6) lens: while useful for architecture photography, it won’t get used enough to justify the weight
- My Lee filters: they won’t be used enough
- My off-camera flashes: no real use for them
In conclusion
A successful trip starts well before your departure. Taking the time to do your research will give you the best chance of coming home with a portfolio of quality shots. By knowing what you are going to shoot, as well as when and where, it allows you to bring only the necessary gear. Having the lightest possible pack will definitely improve your mood on the days that you are walking for the majority of the day. When sharing your vacation with photography work, having a plan will also keep your shooting to a minimum, allowing you to enjoy and experience the places you are visiting as well.
Related article: Tips for Airline Travel with Photography Equipment
I have learned a majority of the tips that I have shared here from talking with other photographers about how they do things, and I encourage you to do the same. If you have any helpful tips (or questions), you can share them in the comment section below.
About the author: When CB isn’t concocting new ways to help photographers reach their fullest potential, you can find him out on the road somewhere, camera in hand, completely in denial that he has a wanderlust problem. If you would like to join CB on one of his adventures, be sure to visit his website at CB Friedland Photography. You can also follow him on Facebook, Google+, and Instagram to see additional stories and tips to help “Accelerate Your Learning!”
Have something to add to the story? Leave a comment or email editor@outdoorphotographyguide.com.
Great photos and thanks for the information
Getting ready to go to Spain and Portugal and was debating on my micro 4/3rds Olympus and or my Canon 7D or my new 5Dmkiv. But love the idea of taking the Olympus as a backup. I have aleady looked at Google Maps and general ideas via the net for places and proximites. Even used Youtube to take mini tours. Thank you for the article and the tips.
<strong> Ticket 22149 If I use my canon 80D...not a full frame: my lense options are: EFS 18-55 F3.5, Tokina SD 11-16 f28, EF 70-300 f4, EF 24-105 F4L. During a similar trip to your river cruise...which lenses would you bring with? As you can see I have full frame and modified frame lenses.
Informative but needs more details with photos