When I first took up landscape photography, I carried around a big, bulky pouch of filters that were constantly getting scratched, being dropped, or accidentally getting left behind. As digital technology and file quality has improved, the need for most of those filters faded away.
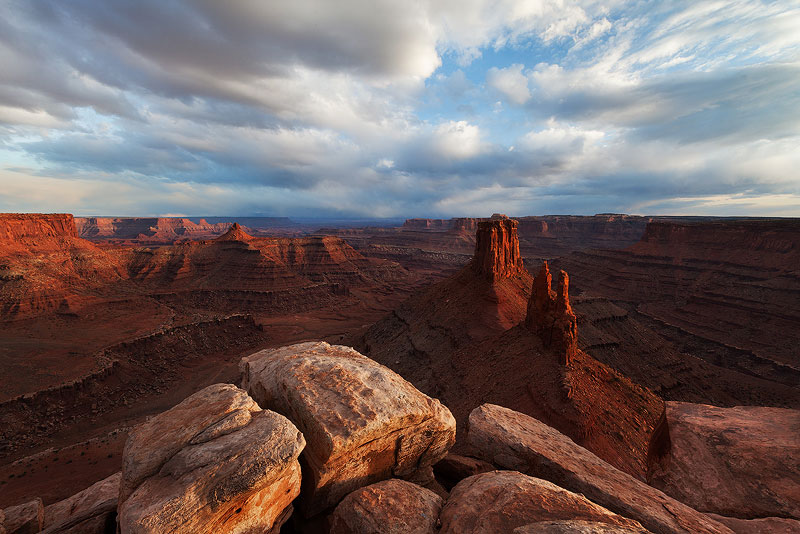
Even though cumbersome pouches of graduated neutral density filters are no longer necessary for many photographers, I still consider two filters essential for digital landscape photography: solid neutral density filters (a filter that allows a photographer to extend their shutter speed for creative effect, like the long exposure in the photo above) and polarizers.

I consider these two filters essential because it is impossible to recreate many of their effects in post-processing. For this article, we will focus on four ways that landscape photographers can best use polarizers in the field.
Related eBook: Beyond the Grand Landscape: A Guide to Photographing Nature’s Smaller Scenes
Polarizer Basics for Landscape Photographers
Simply put, a polarizer is a filter that affects the way that light is transmitted to your camera’s sensor. This changes the way that different elements of your scene are rendered, depending on the conditions and the subjects you are photographing. We will cover four of a polarizer’s primary effects in this article:
- Darkening and adding contrast to skies
- Removing glare and enhancing colors
- Enhancing glare and reflections
- Enhancing rainbows
There are two types of polarizers available to photographers: circular polarizers and linear polarizers. These designations relate to how the filter affects the light traveling through the polarizing filter material. Digital photographers will want to use a circular polarizer due to the ways that digital cameras use autofocus and meter light. If you are interested in the technical aspects of how a polarizer works, you can find a lot of information through a quick web search. For this article, we will focus on the practical aspects of how to use a polarizer in the field.
Polarizers are available in two primary formats: 1) round filters that screw onto the threads on the front of your lens and then rotate once they are attached, and 2) an often square but sometimes round filter that drops into a filter holder, with the filter holder attaching to the front of a lens (some photographers also handhold filters of this second type in front of their lens).
I have used both systems and personally find that the screw-on filters are much more convenient to use, even though the filter holder systems are often less expensive (you only need one filter, one holder, and a set of less expensive adapter rings that fit your different lenses rather than a filter that fits each lens). Filter holder systems can also cause vignetting on wide-angle lenses, which is another reason I prefer the screw-on variety.
In my case, I carry around three round polarizers: two 77mm filters from my 16-35mm and 24-105mm lenses and a 67mm filter that fits both my 100mm macro lens and my 70-200mm lens. Since I frequently use a polarizer on my two wider lenses, I like having a polarizer for each to reduce the need to switch filters when out photographing.
Polarizers can be surprisingly expensive. In my experience, the mid-grade and premium varieties seem to perform in similar ways (I generally purchase mid-range polarizers for my own use). I have found multi-coating to be useful in reducing ghosting and flare when used on my wider lenses, so paying a bit more for that feature can be worthwhile if you photograph using a wide-angle lens. On the lower end, I have found cheap polarizers to be problematic, as their low quality glass can muddy colors and reduce file quality. For wide-angle lenses, you may also want to select a thin-mount polarizer to help reduce vignetting on the edges of your frame.
Related eBook: Forever Light: The Landscape Photographer’s Guide to Iceland
Using a Polarizer in the Field
First, think of a polarizer like a pair of sunglasses for your lens (and, if you have a pair of polarized sunglasses, you may already be familiar with some of the effects we discuss in this article). Polarizers reduce the amount of light reaching your camera’s sensor, so you will need to adjust your exposure accordingly after adding a polarizer to your lens. Most polarizers will usually reduce your exposure by about one to two stops. Since landscape photographers are often most concerned about depth of field, keeping your aperture constant and changing your shutter speed or ISO will likely be necessary after affixing a polarizer to your lens.
A polarizer’s effect on your scene changes as you rotate it. So, after adding a polarizer to your lens, you should always spend some time studying the effect on your particular scene at different rotations to decide what setting will work the best. You can see the polarizer’s effect when looking through your viewfinder, in live view, or looking at a finished file on your LCD.
#1: Using a Circular Polarizer to Darken and Add Contrast to Skies
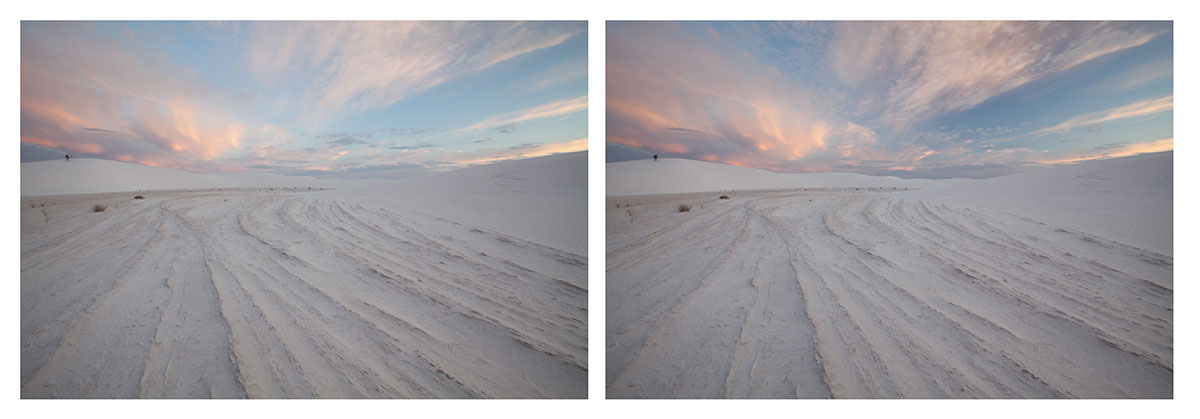
Darkening and adding contrast to a sky seems to be the most commonly known reason to use a polarizer but is only the start of their usefulness for landscape photographers. For the sky, the effect of the polarizer will change based on the position of your camera relative to the sun, with the strongest effect happening when your lens is oriented at 90 degrees from the sun. At the maximum effect, a polarizer can significantly darken the sky and add the appearance of definition to clouds. For this reason, you should be diligent about using a polarizer to enhance skies and select the degree of the effect carefully.
In some cases, like the example shown below, the effect can come off too strongly and make a sky look overly dark. While this effect can be desirable in some cases (like high contrast black and white photography with white clouds against a very dark sky), over-polarization can easily ruin a photograph if overdone. Additionally, when using a wide-angle lens, the effect can be inconsistent across the frame as also seen in this example, leaving one section of dark banding where the effect is the strongest. Since these effects can be difficult to reverse during processing, try to make good technical decisions in the field. It is better to experiment when you are out taking photographs, taking multiple exposures at different settings if you are unsure about which setting you like best. Then, you will have different options to choose from once you see your photos on a larger screen at home.
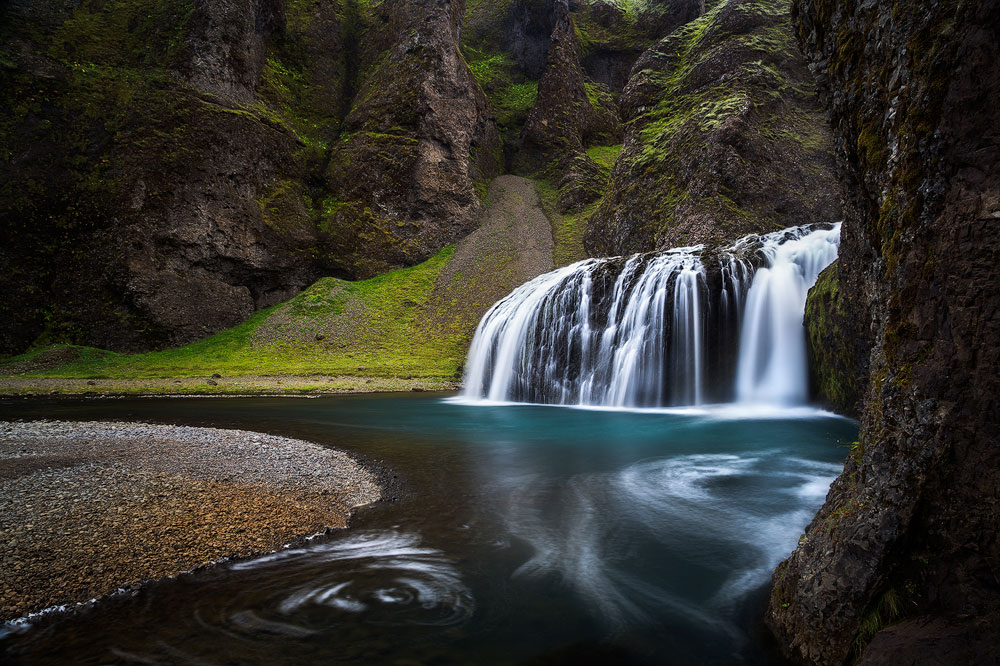
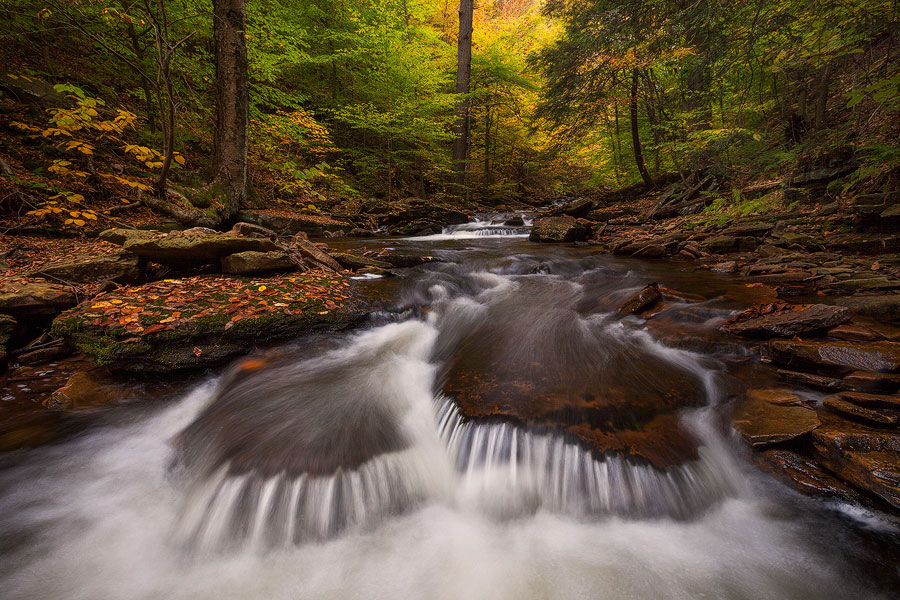
#2: Using a Polarizer to Remove Glare and Enhance Colors
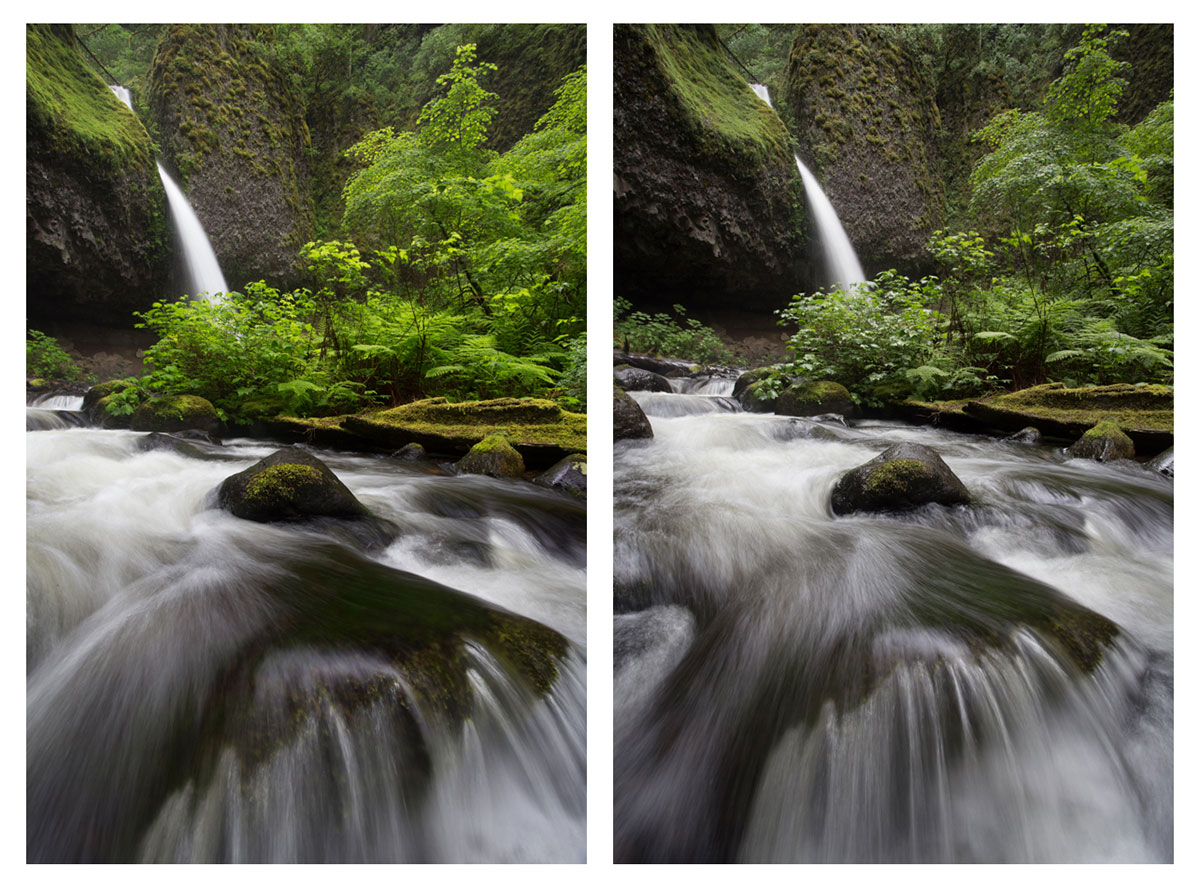
In addition to using a polarizer to enhance a sky, a polarizer can be an important tool to reduce glare on natural subjects. For example, think about photographing a waterfall in a forest. A polarizer can reduce the glare on surfaces like the shiny foliage, wet rocks, and the surface of the water. Take the sample photos below. In the RAW file on the left, you can see how the polarizer minimized the glare on the leaves, the rocks, and the cliffs in the background and enhanced the greens. Just like when using a polarizer to enhance a sky, take some time to study the effect of the polarizer on your scene and make a decision about what looks best.
#3: Using a Polarizer to Add Glare and Enhance Reflections
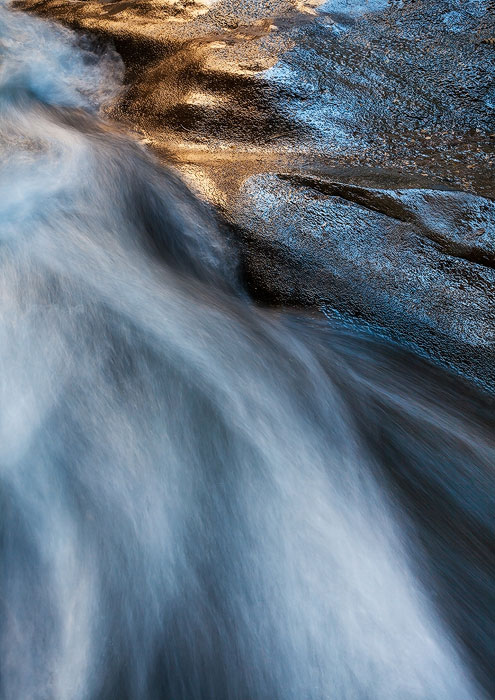
While you may usually want to remove glare from a scene, there are times when you may also want to add glare, like enhancing a reflection on a lake, showing off the shiny qualities of waxy leaves, or enhancing the reflected light on wet rocks as seen below. Take the example of a mountain reflecting in a lake. At one setting, a polarizer will eliminate much of the reflection, allowing you to capture the rocks below the surface of the water. By rotating the filter, you can also enhance the reflection of the mountains on the surface of the water beyond what your camera will capture without the polarizer attached. Just as in the other two examples, it is important to experiment in the field to see what polarizer setting works best for your scene.
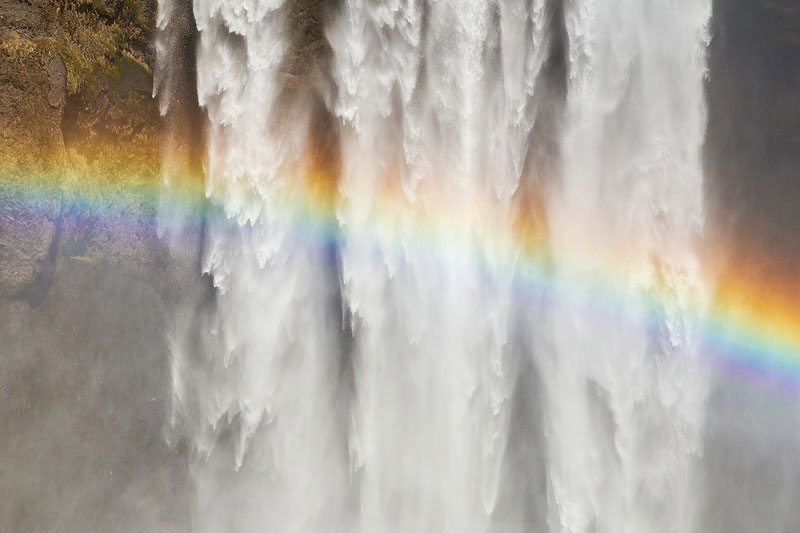
#4: Using a Polarizer to Enhance Rainbows
Finally, a polarizer can enhance the appearance of and colors in a rainbow (and, can also fully eliminate the rainbow from a scene by further rotating the filter). The next time you see a rainbow in the field, put a polarizer on your lens and rotate it, watching for the effect. Since rainbows can often look better to the eye than they do when recorded in a photo file, using a polarizer to enhance a rainbow can help you get closer to the view that you witnessed in person.
Related eBook: Desert Paradise: The Landscape Photographer’s Guide to Death Valley National Park
Bonus Tip: Consider “Polarizer Blends”
Let’s take three reasons to use a polarizer and consider the techniques you might use in the field for a particular scene: an expansive view of a mountain reflecting in a lake. In this case, you might want to use the polarizer to reduce the glare on the foliage, enhance the reflection, and darken the sky. The problem with this scenario is that the ideal polarizer setting for each of these goals might be different. You do not want to overly darken the sky while enhancing the reflection on the lake and reducing the glare on the foliage.
In this kind of instance, you can choose the single setting that is the best compromise for all aspects of your scene. Or, you could take three different exposures while in the field, one for each of the optimal polarizer setting – mountain, foliage, and reflection. Then, when you get to processing the photographs, you can combine the parts of each file that has the optimal effect from a polarizer into a single file using simple layers and masks in Photoshop.
Final Thoughts
Bringing a polarizer along in the field can make a huge difference in the ways we discussed above, so I encourage you to make sure you always have one in your camera bag. Although it seems like a quite simple tool, a polarizer can help you make creative decisions in the field to help enhance and improve your final photographs in ways that cannot be replicated with photo processing tools.
If you have any additional suggestions for how your fellow photographers can best use a polarizer, please share them in the comments below.

About the author: Based in the Rocky Mountain West, photographer Sarah Marino travels the country in a 25-foot Airstream trailer with husband and fellow photographer Ron Coscorrosa. Together they produce high-quality educational photography e-books and other nature photography resources. You can view more of Sarah’s work and read her travel stories at www.naturephotoguides.com.
Have something to add to the story? Leave a comment or email editor@outdoorphotographyguide.com.
I wish the author had included brand recommendations for screw-on polarizing filters.
You may see my photos at: Physicssustainablegrowth.blogspot.com
Most of these articles on cpl filters share a common issue - they're guides to getting generic images. I don't know why anyone would want to shoot yet another waterfall photo like that. Even the typical double exposure method mentioned typically leads to generic images. There's one application i'd want a cpl for an that's foilage. For everything else, cpl belongs in the ultrawide + velvia bin for me.
Beautiful photos Sarah, Thank you for the polarizer tips!
Love the photos - great examples of using polarizer. Reducing the glare while enhancing the color saturation really make great pictures as you have shown. What other filters you find useful in digital age?
It would be really nice to have the settings for these pictures :) They are really great!
Great article!. Very helpful!!! Thanx!. Can a circular polarizer filter be used ok by screwing it on top of the UV filter, or should the UV filter be removed first?. Thanx for your guidance!!!!