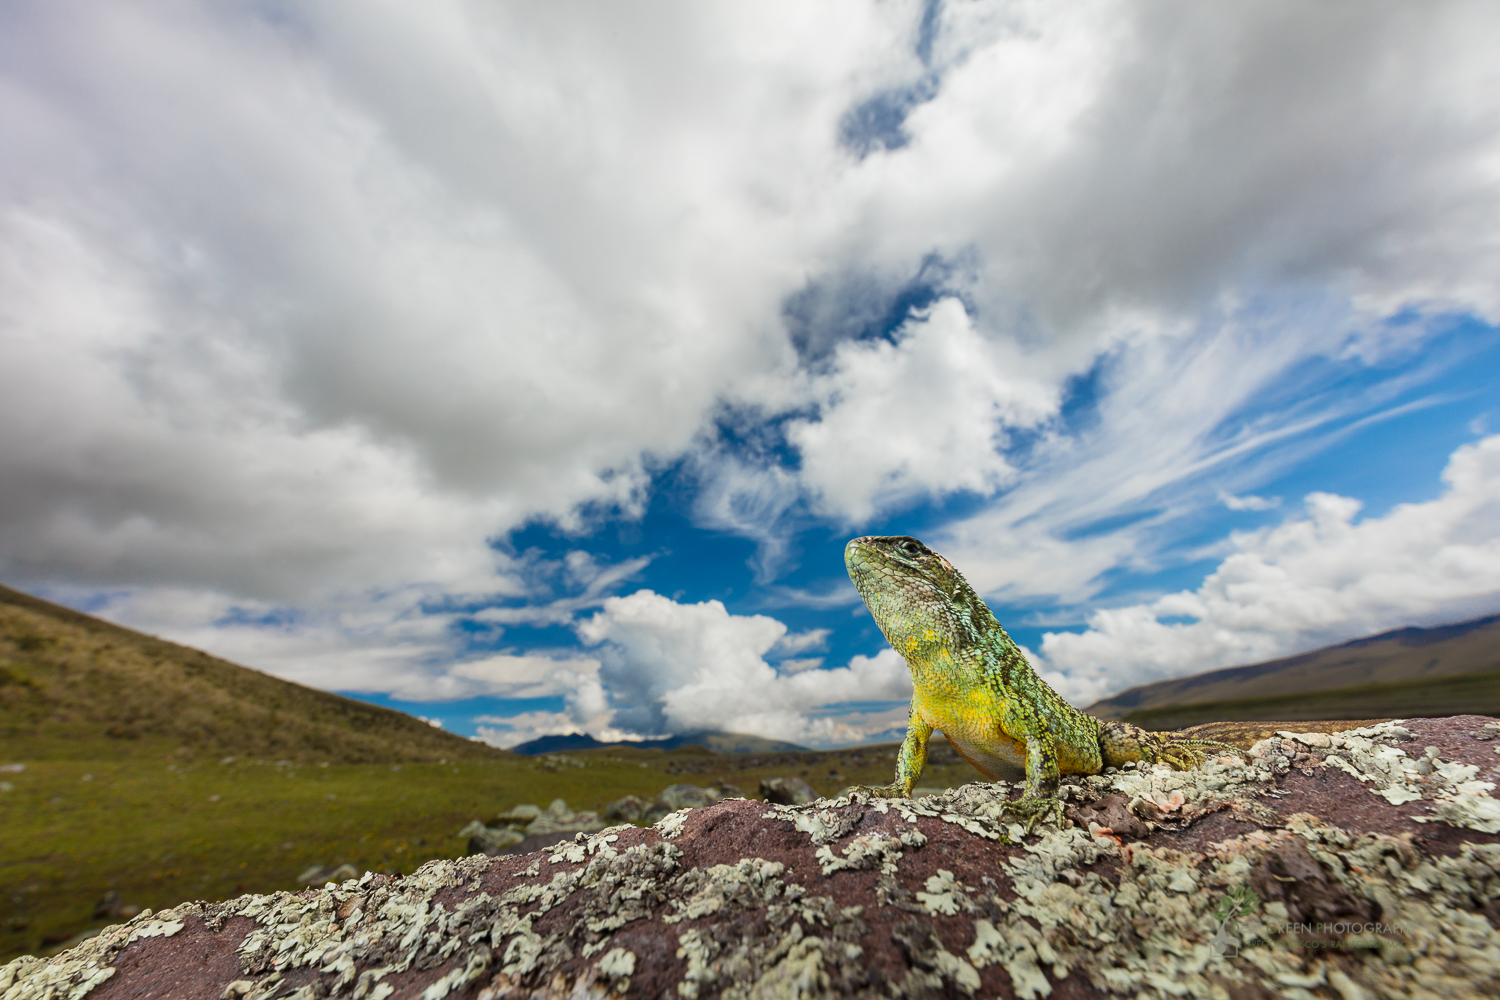
The Scene
While scouting with friends for a new photo workshop in Ecuador, we visited the Cotopaxi Volcano National Park. It’s a beautiful place, and I wanted to take some shots that showed the vast open spaces, which are always exciting for a rainforest photographer (such as myself) as I’m used to very dark, closed forests. On the morning of our second day, we came across this Quito Whorltail Lizard (Stenocercus guentheri), which has beautiful colors on its underside. After a cold rainy night at about 11,000 feet above sea level, the lizard was happy to catch a little sun as the clouds broke. I thought it would be a good candidate for a wide angle closeup shot that would show this cool lizard in its high mountain environment.
Camera Settings
My gear choices were easy. I already had on my tripod a full-frame camera body and a 16-35 mm zoom lens with a polarizing filter as we were shooting landscapes. That would be perfect as it would offer the grand perspective I wanted, and the polarizing filter would deepen the colors in the scene. You may be thinking that the polarizer would be a net negative because it would cut 2 stops of light, thus compromising my shutter speed. And that’s a good consideration, but I wasn’t worried about it for three reasons.
First, I would be working handheld and lying on my stomach to get the perspective I wanted. The Canon 16-35 mm lens has good, quick autofocus and nice image stabilization. Second, for the shot to work, the lizard would need to stay still. If he began to run around too much, the opportunity simply wouldn’t be there. So, I didn’t need a particularly fast shutter speed. Third, given the lighting conditions, I knew right away that I would want to use some fill flash in order to bring out the colors on the underside of the lizard. The brief pop of flash would also aid in sharpness.
I had my plan. Before I approached the lizard, I did the following things:
- 1. I turned my polarizer to full effect and set an autofocus point in the lower right part of the frame where I planned to place the lizard in terms of composition.
- 2. I metered my scene in manual mode and set my exposure for the clouds, taking care to keep them from blowing out. My starting point was my aperture, which I set at f/16 in order to give me plenty of depth of field. (Wide angle lenses do not have more depth of field than macro or telephoto lenses. Depth of field is dependent only distance/subject magnification and aperture setting.) I then set my shutter speed to 1/60, which I felt was reasonable enough to handhold while lying on the ground and supporting my camera with my elbows. I then looked at the scene and adjusted my ISO until I had an exposure that protected my clouds. That ISO turned out to be 100, great for an ultra-clean, detailed image.
- 3. I knew I would be using flash. I always have two with me in my camera bag, and I always have an off-camera flash cord and a couple of small softbox as well. I quickly fitted a softbox to my flash and then attached the cord to my flash and camera’s hotshoe.
- 4. Considering the scene, I knew I wanted to work with TTL flash and then determined that I would probably want to dial in a little bit of negative flash exposure compensation. This is simply a question of experience in judging a subject and its relationship to the light in context of the larger scene. I chose -1 stop.
Composition
Since I had everything ready, it was now time to approach the subject. I did so carefully while a friend held the flash for me. I composed to have the lizard in the bottom right of the frame which gave me horizontal space on the left for the lizard to gaze into and gave me vertical space at the top for the puffy clouds, which were very important. I took a few shots, varying my flash exposure compensation values slightly and then retreated leaving our lizard friend to continue enjoying the sun. The image presented here is my full-frame composition.
Processing
I use Lightroom for the vast majority of my processing, and this image was no exception. I used the shadows and highlights sliders to adjust tones slightly as well as a graduated filter to bring out contrast in the sky.
The Lesson
For any scene, whether it’s a landscape or a flower or a person, having a plan before beginning to photograph is a great idea. For potentially skittish animals, quickly formulating a plan even as you are approaching a subject is essential. Previsualizing your final result will serve as a guide for your gear choices and settings. Knowing your camera gear well and having a good plan will help allow you to get your shot without spooking or stressing your subject too much.
 About the author: Greg Basco is a professional nature photographer and environmentalist based in Costa Rica. You can view more of his work at www.deepgreenphotography.com. If you’d like to join Greg in Chile this October, visit his photo tour company’s website www.fotoverdetours.com.

Share tips, start a discussion or ask one of our experts or other students a question.
Already a member? Sign in
2 Responses to “Behind the Shot: Life on a Volcano”

Nice article. Depth of field depends only on magnification and aperture. Not "aperture setting" (f-stop). The aperture size (diameter) at a given f-stop is proportional to the focal length, as in the formula, aperture-diameter = f/f-stop-number. For instance, at f/16 the actual size of the aperture is one-sixteenth of the focal length (1 mm if you're using a 16 mm lens, or 12.5 mm if you're using a 200 mm lens). The larger the aperture, the less depth of field there is, when magnification is held constant. So when magnification is held constant, at any given f-stop, a photo taken at a shorter focal length has more depth of field than one taken at a longer focal length, because the aperture is smaller at the shorter focal length.
Great photo! Looking for more.